
Assign a teacher to a class (make them a class teacher)
Teacher joined the institution but sees nothing? This one job fixes it — 2 minutes.
The screenshots show the app in Bangla, its main language. The buttons sit in the same places in English.
-
First understand the problem. A teacher needs TWO steps to work in Hazira Khata — (1) join the institution, (2) be told which classes are theirs. Usually the first is done and the second is missing. Then the teacher can sign in but everything inside looks empty.
If the teacher's phone says "প্রতিষ্ঠানের এডমিন এখনো আপনাকে কোনো ক্লাসের দায়িত্ব দেননি" (the admin has not given you any class yet), this is exactly your problem and the steps below fix it. Nothing is wrong with the app and no update is needed.
-
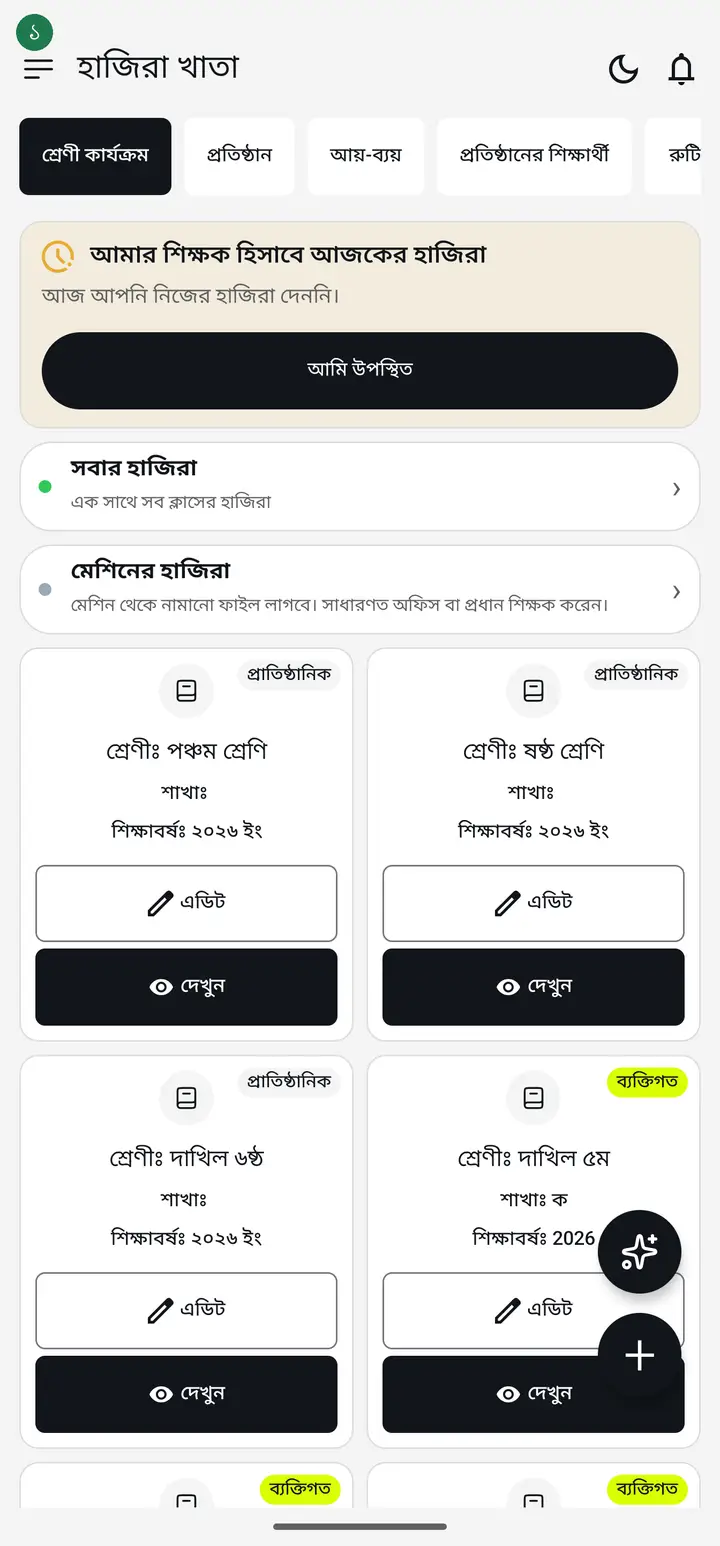
Your class list is on the home screen. Find the class the teacher actually teaches.
-
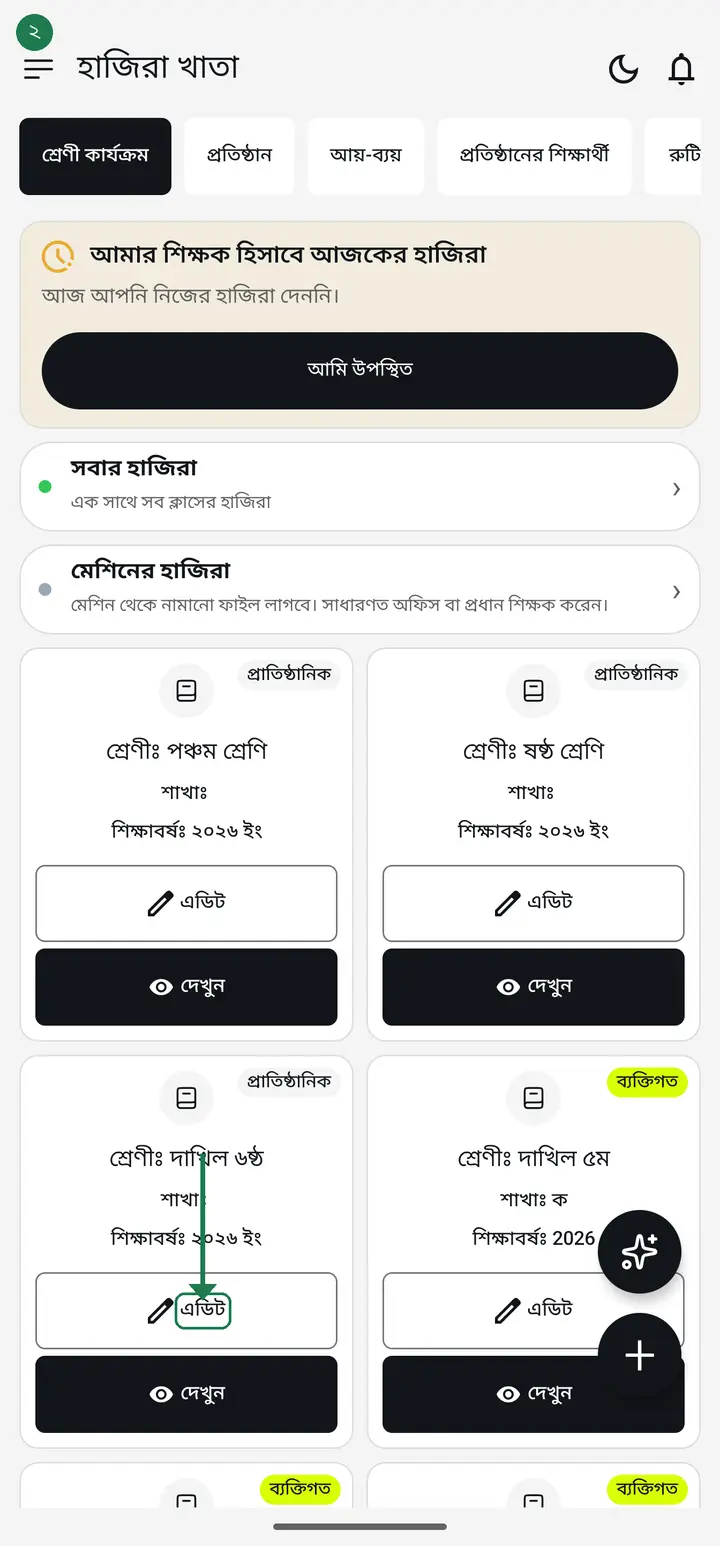
Tap "এডিট" (Edit) on that class card. Careful — every card has an "এডিট", so check the class name first.
-
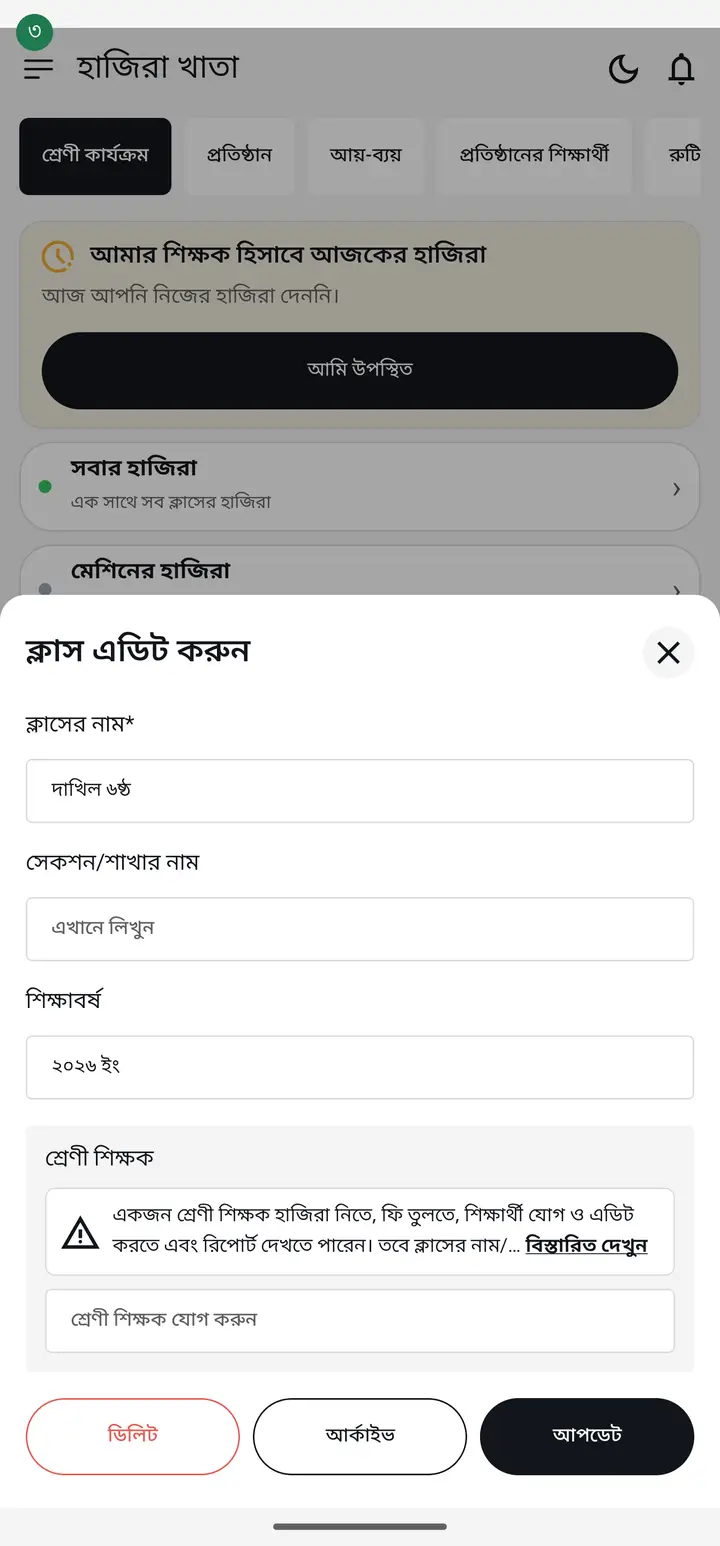
The "ক্লাস এডিট করুন" (Edit class) page opens. Scroll down a little to the "শ্রেণী শিক্ষক" (Class teacher) box, which says "শ্রেণী শিক্ষক যোগ করুন" (Add class teacher) inside. Tap that box.
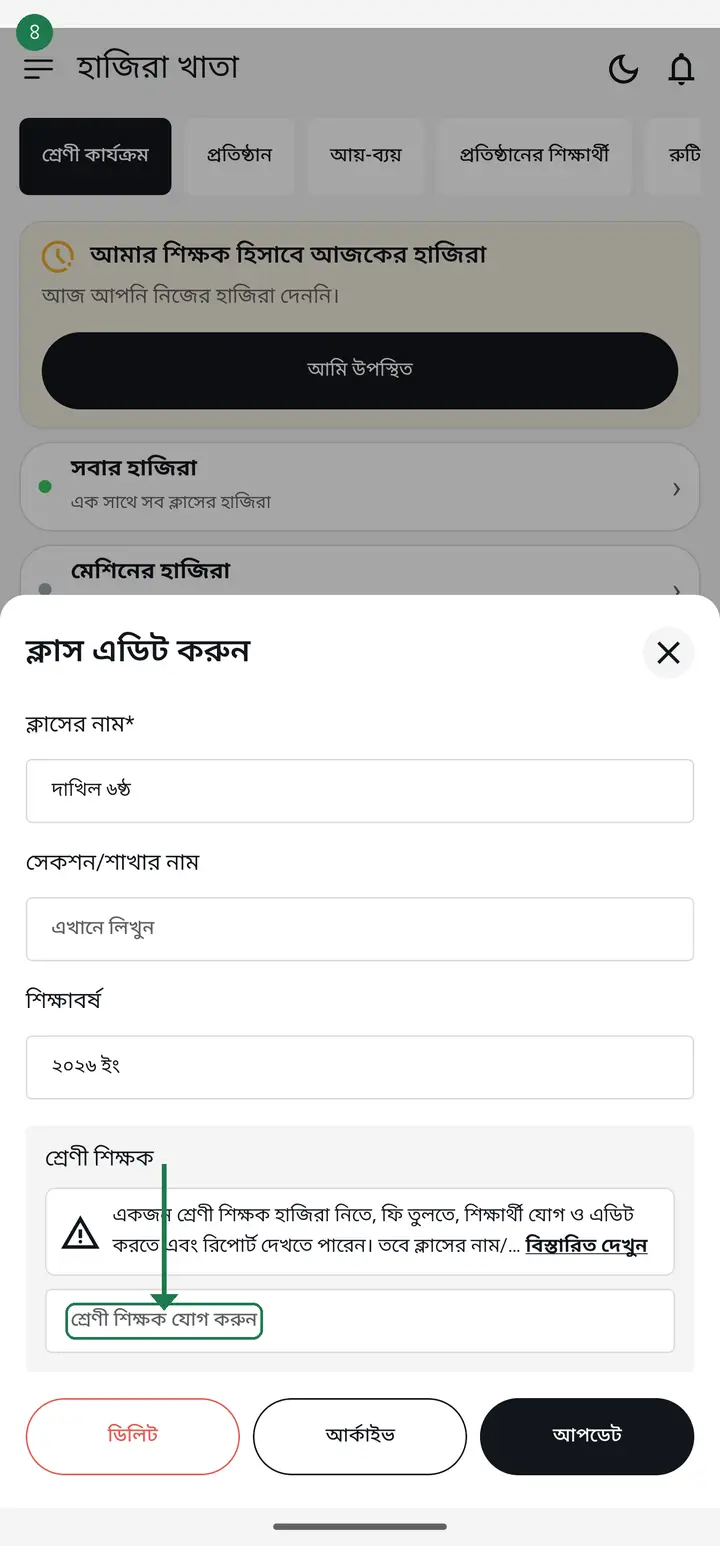
If you cannot see the box, either (1) this is a personal class, not an institutional one, or (2) you are not an institution admin or head master — only they can see it.
-
A list of teachers appears. Tick the teacher you want for this class. If the list is long, type a few letters in "শিক্ষক খুঁজুন" (Search teacher) at the top.
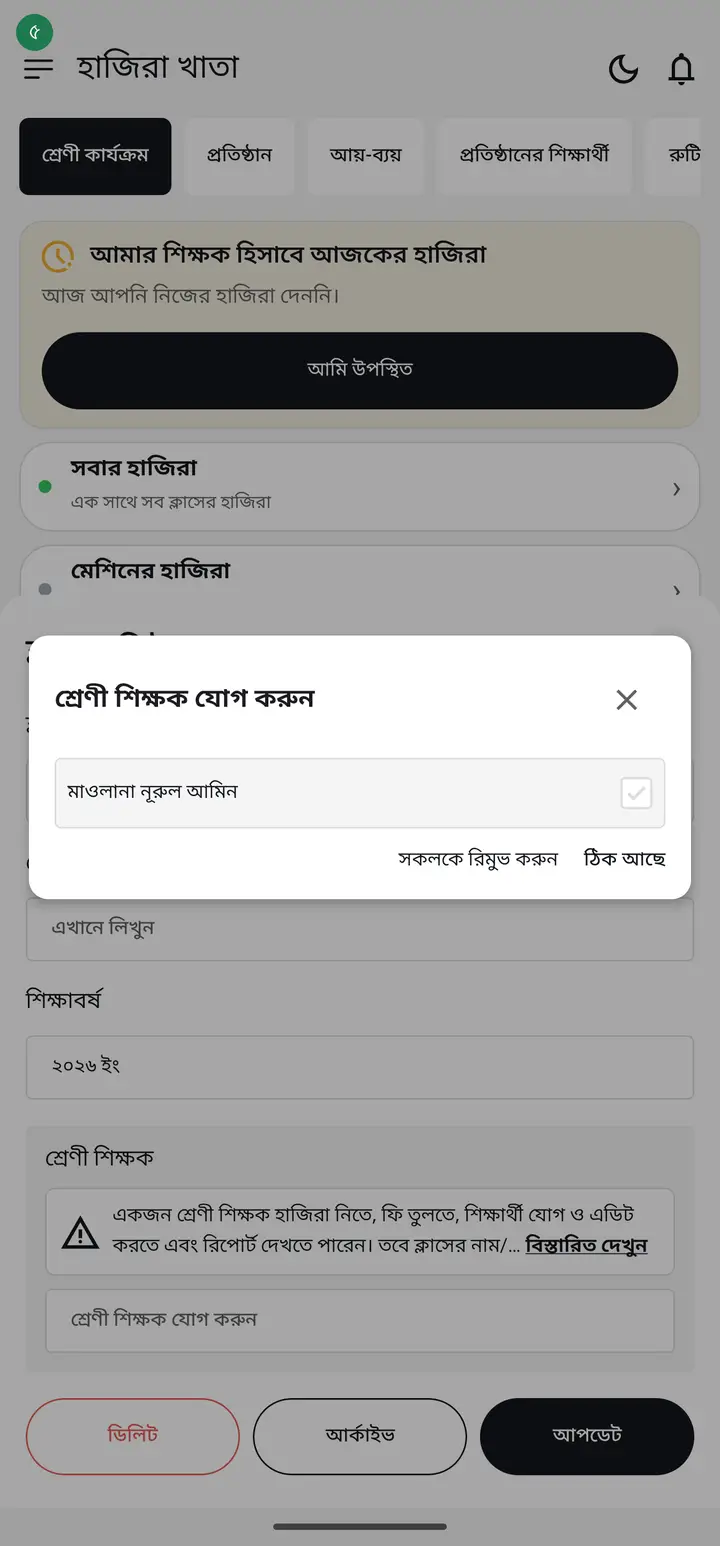
You can tick more than one teacher for a class. And a teacher must be ticked in EVERY class they teach — ticking once does not cover all classes.
-
Tap "ঠিক আছে" (OK) at the bottom. A small "সতর্কতা" (Warning) message appears — tap "ঠিক আছে" there too. That is it, done.
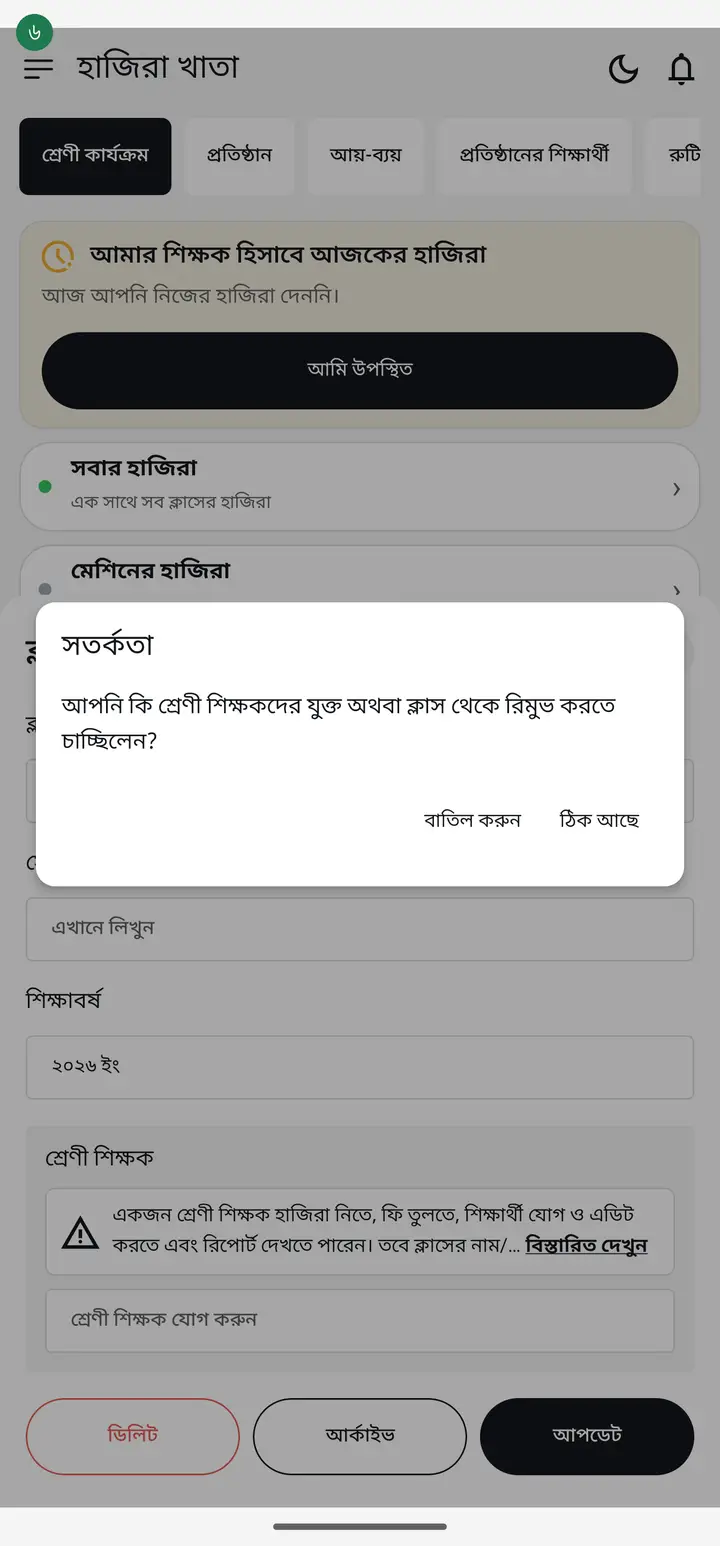
The second "ঠিক আছে" saves by itself. You do NOT need to tap "আপডেট" — that button is for changing the class name, section or session, not the teacher.
-
Now ask the teacher to close the app fully and open it again. They will see their class, students and attendance.
-
If a teacher teaches 3 classes, do this 3 times — once per class. About 20 seconds each.
-
The main job is done. The rest is optional — you only need it if you do NOT want a class teacher to also collect that class's fees. On the same "ক্লাস এডিট করুন" page, right below the "শ্রেণী শিক্ষক" box, there is another box called "বেতন কালেকশনের অনুমতি" (Fee collection permission). It starts out saying "সবাই পারবেন (কিছু ঠিক করা হয়নি)" (everyone can, nothing set).
Leave this box alone and nothing changes — every class teacher of this class can collect fees, exactly as before. Your existing classes are untouched; there is nothing you must set.
-
Tap the box. A list called "কারা বেতন তুলতে পারবেন" (Who may collect fees) appears, holding this class's class teachers. Tick only the ones you want to allow, then tap "ঠিক আছে" (OK).
The list only holds this class''s class teachers. If someone is missing, make them a class teacher first (steps above) — granting fee access to a teacher who cannot even see the class does nothing. And "ঠিক আছে" saves by itself here; you do not need to tap "আপডেট".
-
The box now lists those teachers. Anyone not on the list will no longer see the "বেতন/ভাতা/ফি হিসাব" button when they open this class. And if you tick nobody and tap "ঠিক আছে", it reads "কোনো শিক্ষক না — শুধু এডমিন ও প্রধান শিক্ষক" (no teacher — admins and the head teacher only).
Admins and the head teacher can always collect, even with nobody on the list. You cannot lock yourself out.
-
To go back to letting everyone collect, tap "সব শ্রেণী শিক্ষককে আবার অনুমতি দিন" (let every class teacher collect again) under that box. To check it worked, ask the teacher to fully close and reopen the app and open the class — whether the "বেতন/ভাতা/ফি হিসাব" button is there tells you.
Common questions
The teacher's name is not in the list at all. What now?
If the list says "আপনি ছাড়া এই প্রতিষ্ঠানে আর কেউ যুক্ত হননি" (nobody but you has joined), that teacher has not joined yet — sending the invitation is not enough. Tell them to sign in with the SAME number you invited. Their home screen will then show your institution card with an "একসেপ্ট" (Accept) button. Once they accept, you get an accept prompt too; approve it and they become a member and appear in this list.
A teacher's name shows as "null". What is that?
Teachers who joined without typing their name used to show as "null". That is fixed. Close the app fully and reopen it and you will see the real names. If a name is still missing, identify the teacher by the phone number shown in the row.
A teacher signed in with Gmail and all their data is gone!
Nothing is gone. To Hazira Khata your phone number and your Gmail are two completely separate people. Work done under the phone number does not show under Gmail, and the reverse. One rule: always sign in with whatever you started with. If you signed in with the wrong one, do not panic — sign out and sign back in with the original and everything is there.
Is being a class teacher the same as a designation?
No, they are separate. The designation (teacher, head master, accountant…) decides how much power someone has; being a class teacher decides which classes they can see. You set both separately. Full list of what each designation unlocks: hazirakhata.xyz/tutorials/staff-roles-permissions/
What can a class teacher do?
Take attendance, collect fees, add and edit students, and view reports. They cannot edit the class name/section/session, delete students, open a new fee ledger, or change a fee's amount — only the head master and admin can. Fee collection can now also be turned off per class — see the optional steps above.
I want to give a teacher the class but not the job of collecting its fees. Possible?
Yes. Class "এডিট" → the "বেতন কালেকশনের অনুমতি" box, and tick only the teachers you want. Everyone else keeps the whole class — attendance, students, reports — they just stop seeing the "বেতন/ভাতা/ফি হিসাব" button. It is per class, so the same teacher can be allowed in one class and not another.
I assigned the wrong teacher. How do I remove them?
Same path — class "এডিট" → the "শ্রেণী শিক্ষক" box. Untick the teacher, then "ঠিক আছে" → "ঠিক আছে". To clear everyone at once there is "সকলকে রিমুভ করুন" (Remove all). If you want to hand it to someone else instead: this picker only lists people already a member of your institution. If the new teacher has not joined yet, invite them first — hazirakhata.xyz/tutorials/invite-teachers/ — and only then will their name appear here.
Ask AI about this page
Ask an AI app to explain this page in simple language.
Copied — now paste it
Get Hazira Khata free on Google Play
More tutorials
- How to set up your institution Once your institution profile exists you can add other teachers, and everyone sees the same classes and students.
- Inviting and approving teachers Adding a teacher to your institution — share the code, then approve the request with one tap.
- Who can see what — designations and permissions How your other teachers sign in, how much power to give each one through designations — and now, more precisely for one person, through permissions too.
- A teacher has left — removing a member Somebody has resigned, or you approved the wrong person. Take the name off in one tap without losing any of the attendance or fees they recorded — and how to leave an institution yourself.
- Record a teacher's salary and send the receipt After paying a teacher, send them a receipt right from the app — instantly if they use WhatsApp, and as a shareable picture even if they don't.
- Taking admissions online Make one link and share it. Guardians fill the form from home, the applications land in your app, and approving one adds the student straight into a class.
- Join a school as a teacher Use the 6-character code your school gave you to join by yourself.
- Keeping the zakat and donation accounts A separate book for zakat, fitra, sadaqah and donations — who gave, which teacher collected it, and where it went.