
Record a teacher's salary and send the receipt
After paying a teacher, send them a receipt right from the app — instantly if they use WhatsApp, and as a shareable picture even if they don't.
The screenshots show the app in Bangla, its main language. The buttons sit in the same places in English.
-
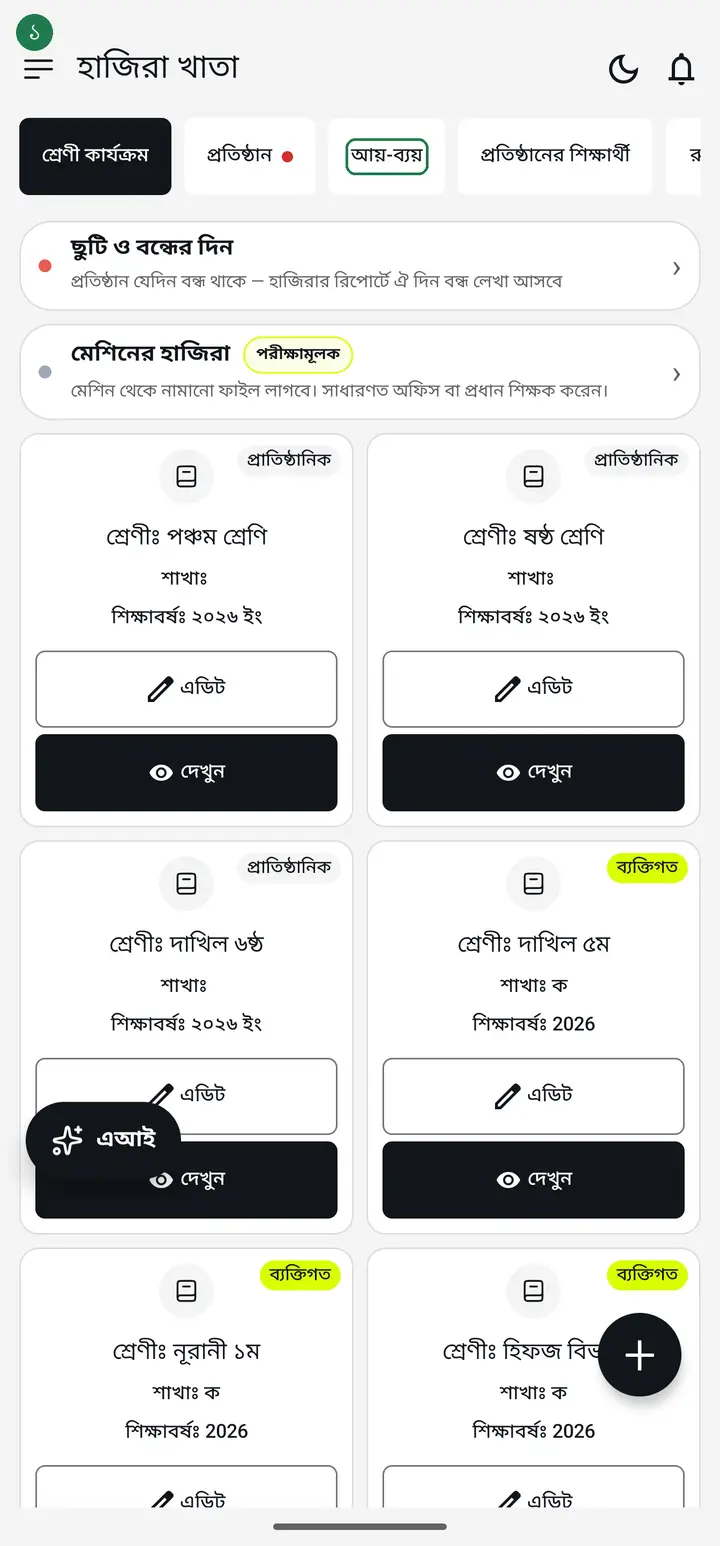
Tap the "আয়-ব্যয়" (Income-Expense) tab.
-
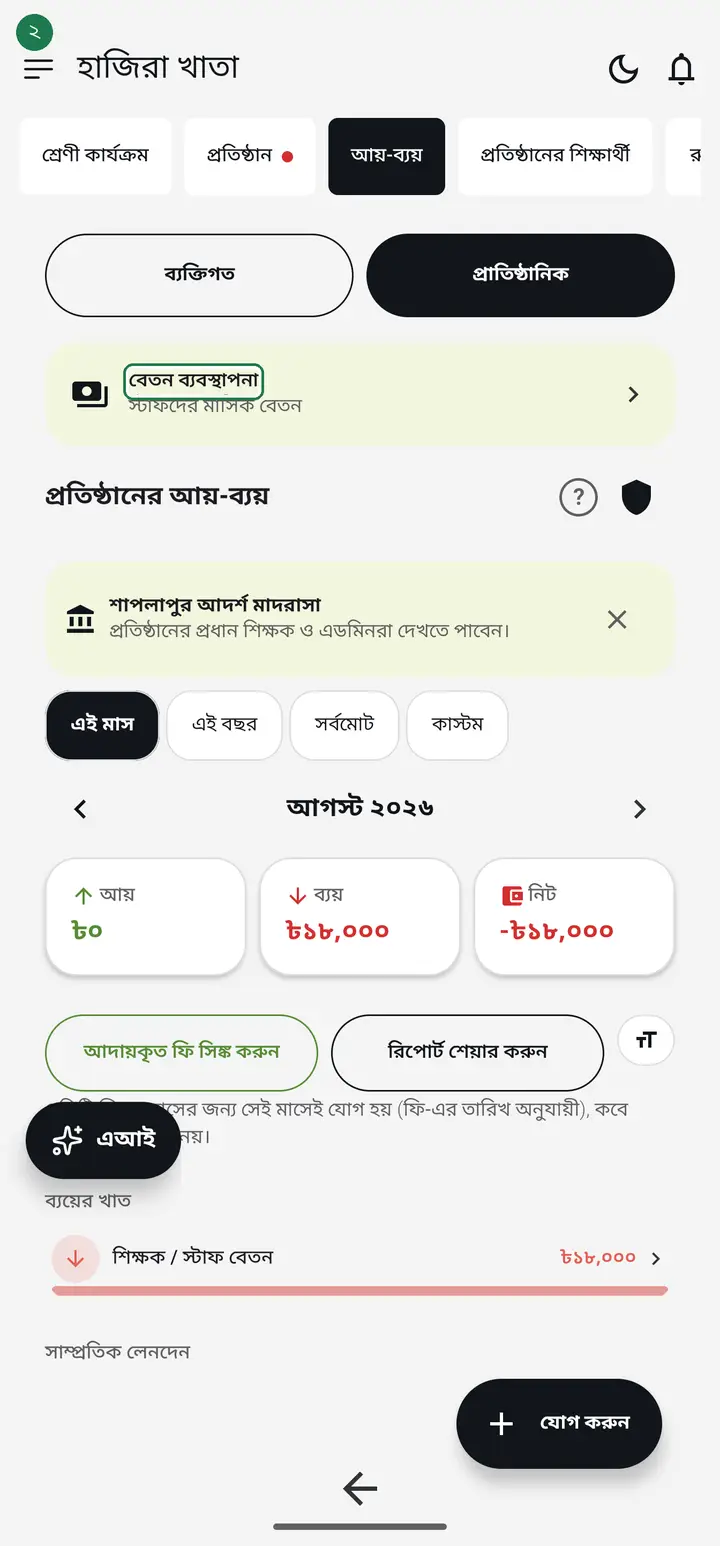
Tap the "বেতন ব্যবস্থাপনা" (Payroll) card — "স্টাফদের মাসিক বেতন" (Staff monthly salary).
-
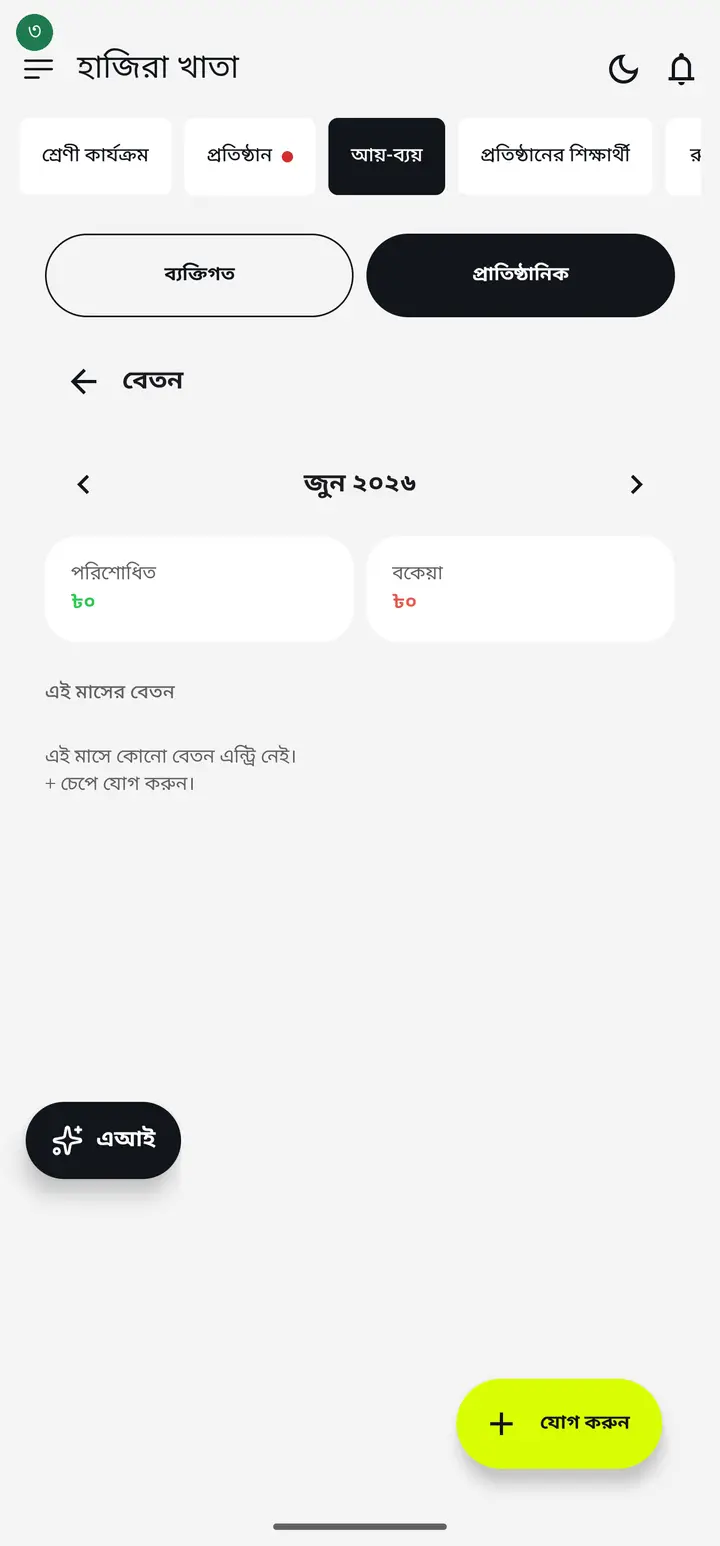
Use ‹ / › to go to the month you are paying for. A month with nothing recorded yet looks exactly like this.
-
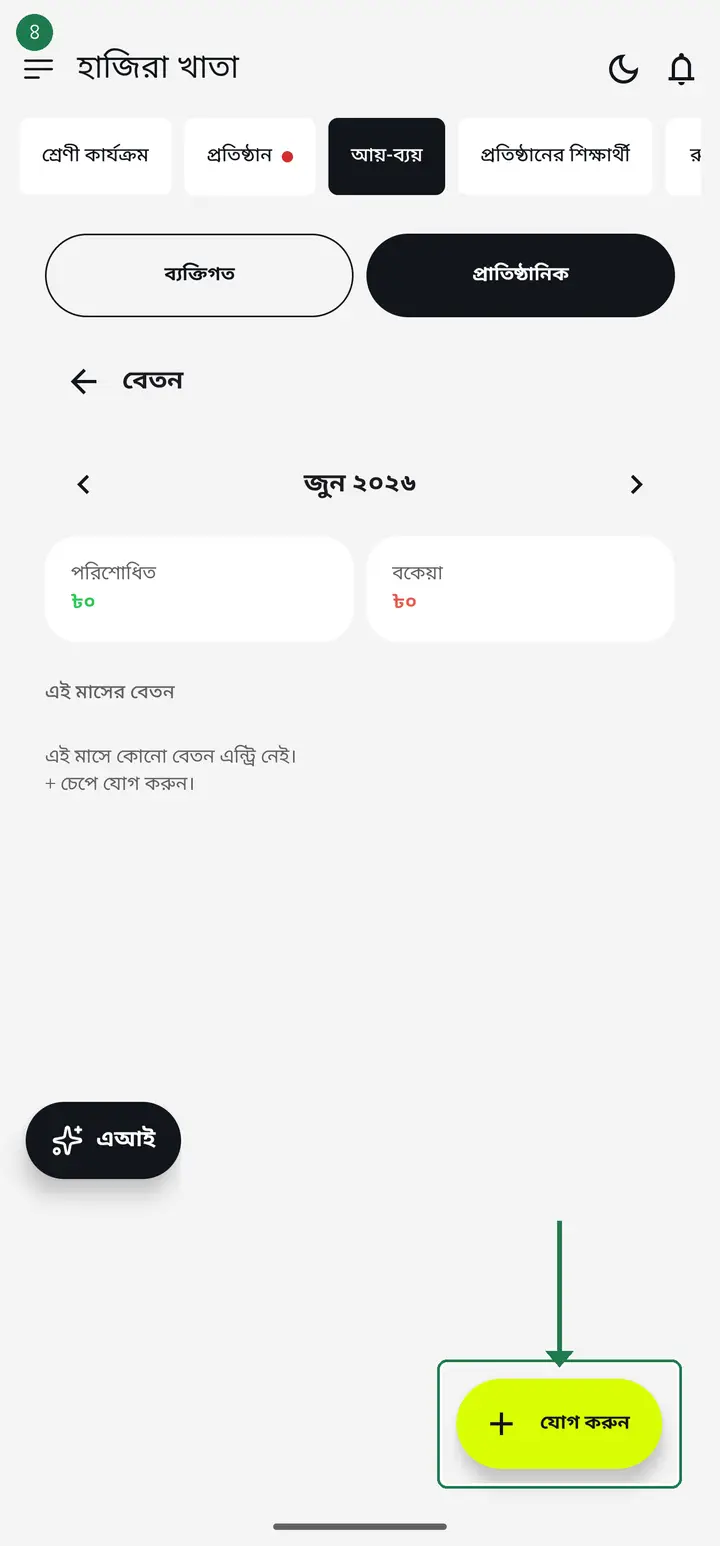
Tap the + button in the bottom-right corner ("যোগ করুন" — Add).
-
Tap the "শিক্ষক / স্টাফের নাম" (Staff name) field to see everyone in your institution. If the person is not listed, tap "তালিকায় নেই — নাম লিখুন" (Not listed — type name) to type it by hand.
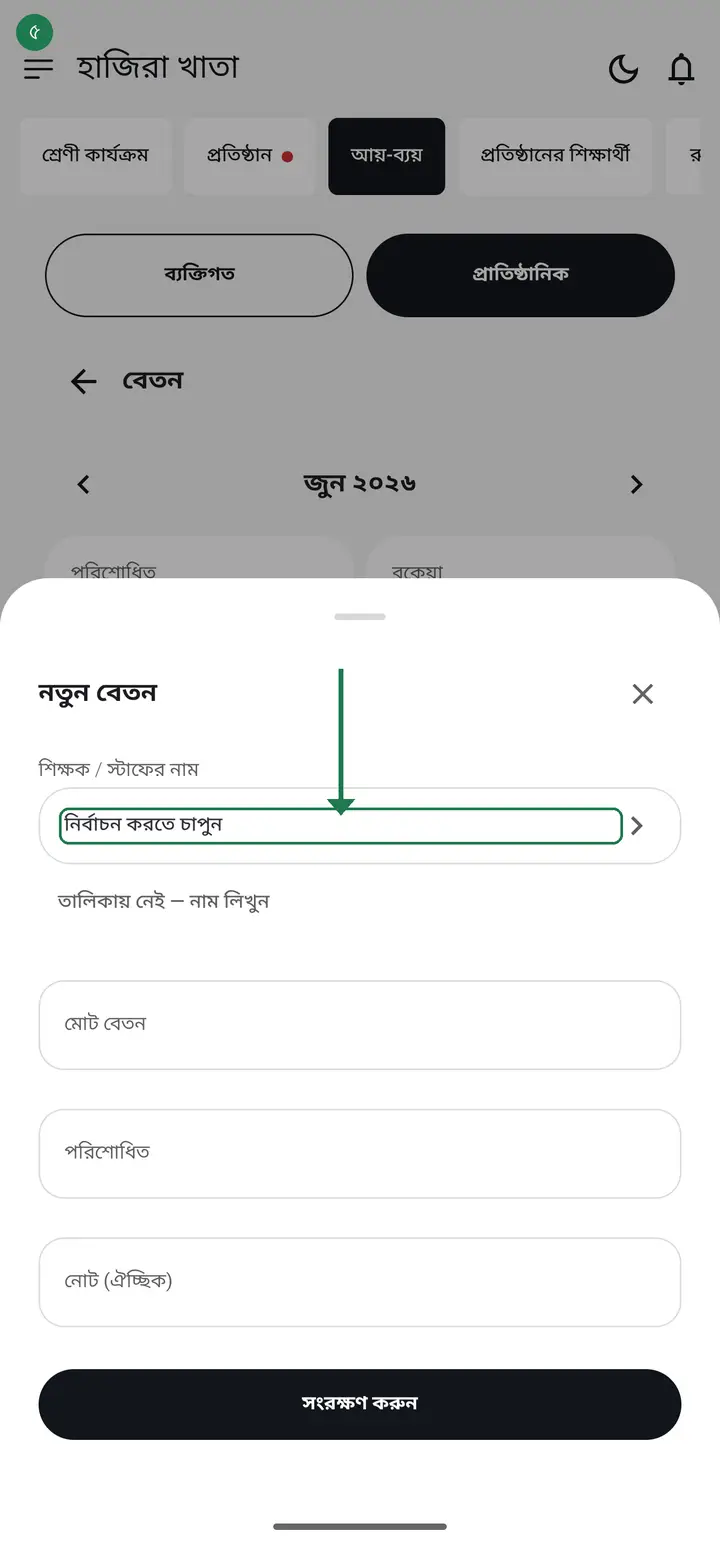
Picking a name from the list links that record to the teacher's own app account — so they later get an in-app push notification and receipt, and can sign "বেতন বুঝে পেয়েছি" (Salary received) themselves. A hand-typed name is not linked — you can still send the receipt over WhatsApp/imo, just not inside the app.
-
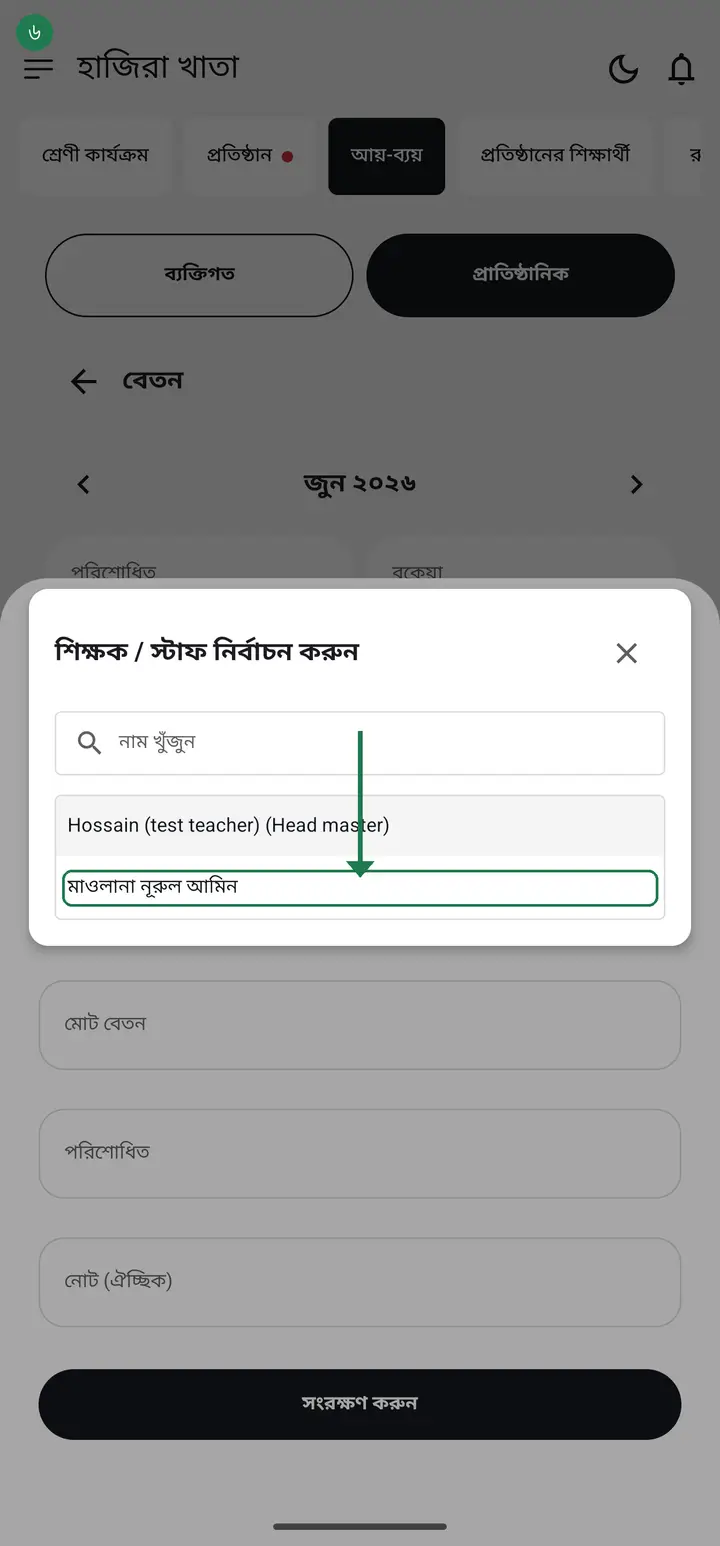
Pick the teacher's name from the list — for example মাওলানা নূরুল আমিন.
-
In "মোট বেতন" (Gross salary) type the full monthly amount, and in "পরিশোধিত" (Paid) type what you are actually paying now. Equal amounts mean the salary is fully paid.
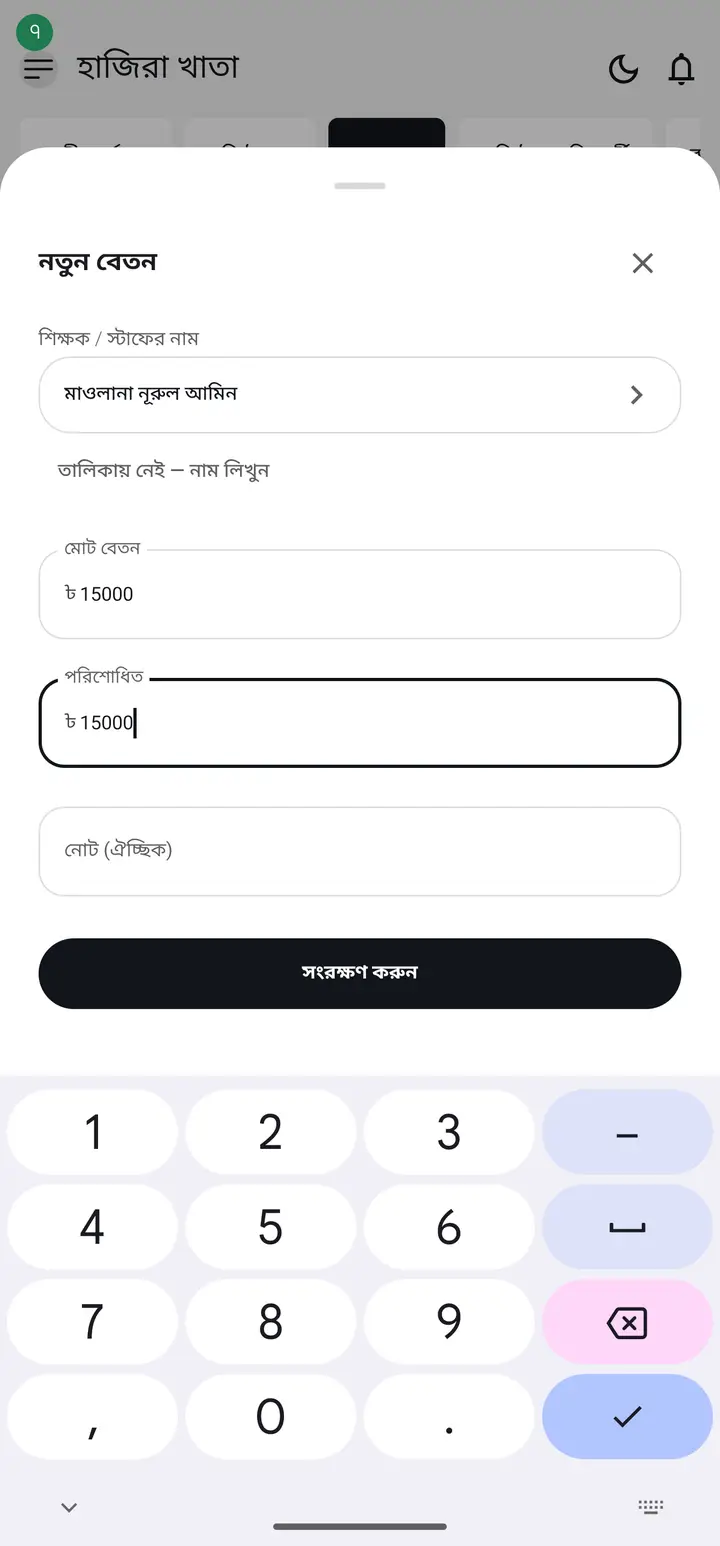
Tap each field separately before typing into it — tapping straight from one field to the next can leave the keyboard on the first one, so the second amount never actually gets typed. Check both fields show the right number before you save.
-
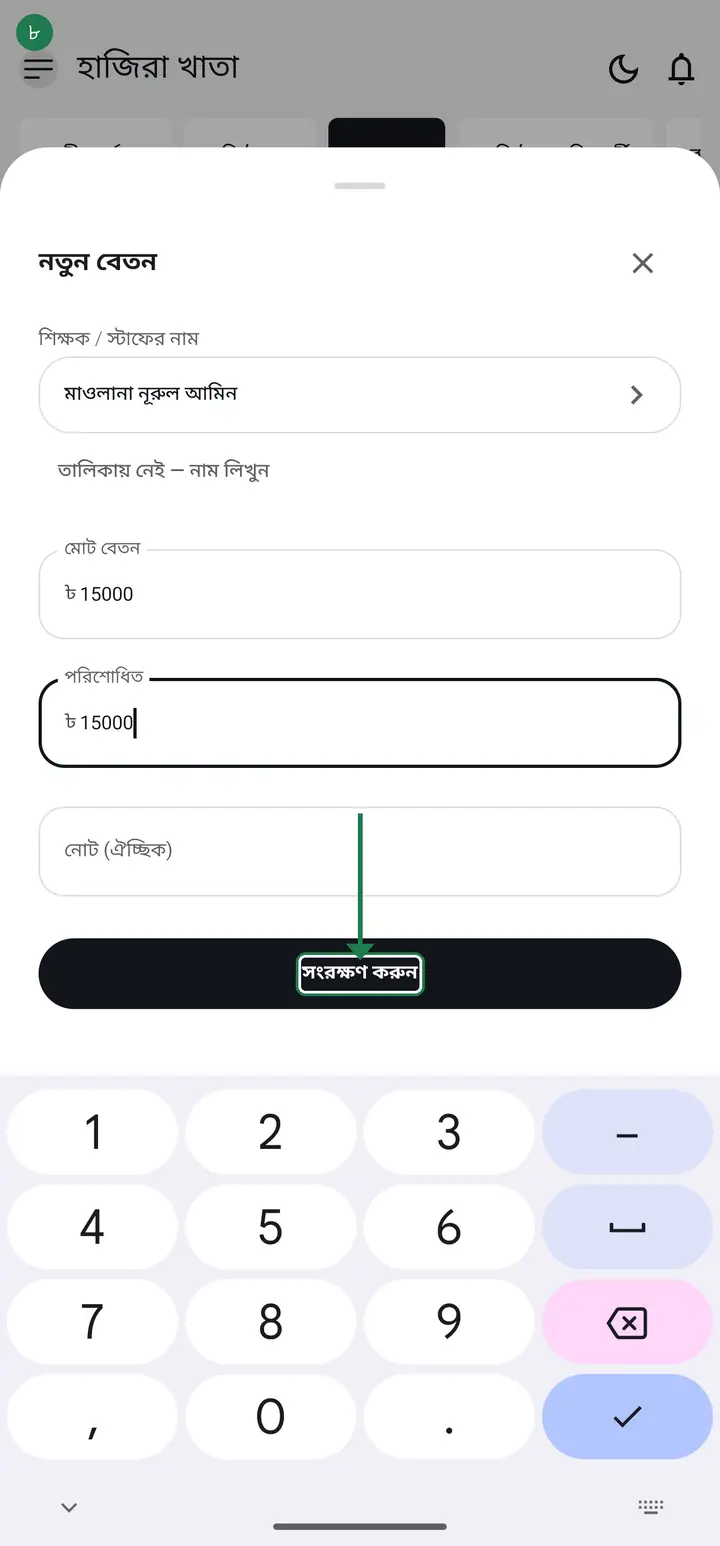
Tap "সংরক্ষণ করুন" (Save).
-
As soon as it saves, this month's list shows the staff member's name, the paid/gross amounts, and a share icon.
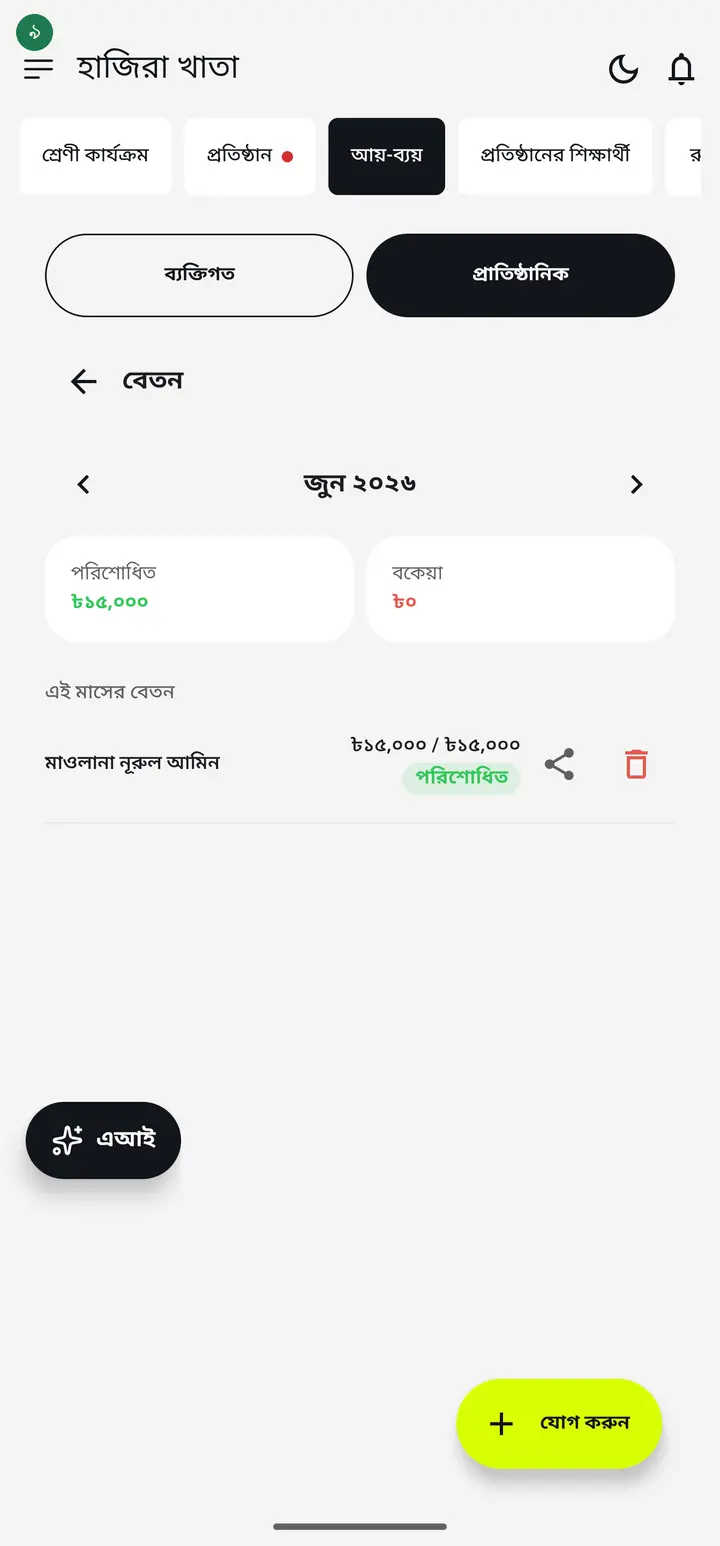
-
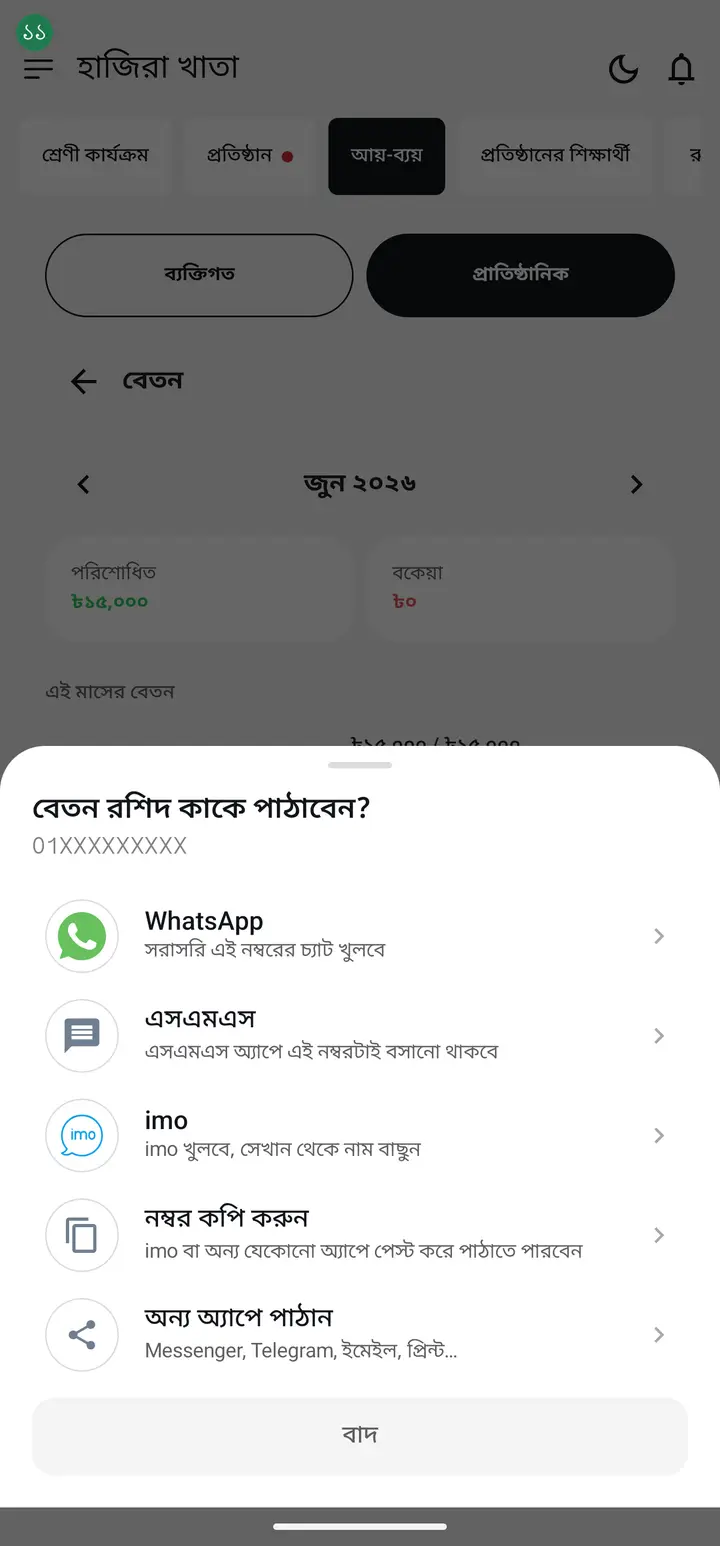
To send the receipt, tap the share icon ("বেতন রশিদ কাকে পাঠাবেন?" — Who should get the salary receipt?).
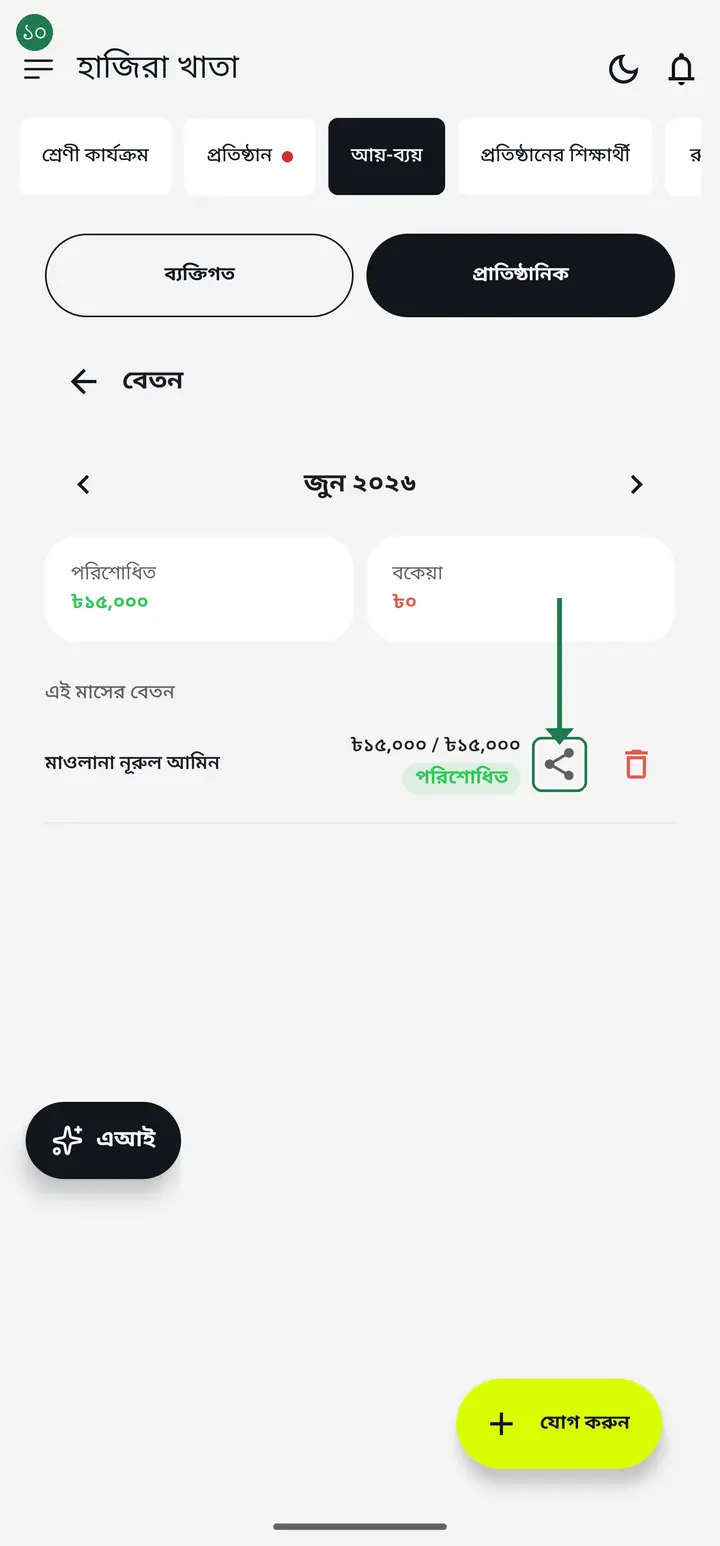
-
If the teacher's number is known you can send straight to WhatsApp/SMS/imo. Even without a saved number, "অন্য অ্যাপে পাঠান" (Send via another app) still sends it as an image.
Common questions
My institution has two heads. Every receipt shows one of them and never me — why?
When more than one person holds the head-of-institution designation, the app picks one of them and picks the SAME one every time, so receipts from one school do not carry different names on different days. The name is not wrong — that person really is a head of the institution, and who entered the payment is still recorded in the ledger. **On the newer build you choose:** প্রতিষ্ঠান → "কাগজে কার নাম ও স্বাক্ষর থাকবে", and the choice applies to certificates, notices and salary receipts alike. **Older builds do not have that row yet;** there the only workaround is to remove the head-master designation from whoever should not be named.
Whose name appears under "অনুমোদনকারীর স্বাক্ষর" on the receipt?
On the newer build it is the head of the institution — the same person whose signature image you uploaded once, so the name and the signature now match. Before, it was the name of whoever typed the salary entry, which put one persons name under another persons signature. That was our mistake and it is fixed. Older builds still print the name of whoever entered it. Note that the audit trail is not lost: who entered and who paid stays on the ledger record. The receipt carries the institutions approval; the ledger carries who did the work.
What if I type the teacher's name by hand instead of picking from the list?
The record still saves, but it is not linked to any account — the payroll list shows "লিঙ্ক করা নেই" (Not linked). That teacher cannot get the in-app notification or see the receipt on their own "আমার বেতন" screen; you can still send them the receipt as an image over WhatsApp/imo.
The same teacher already had an entry for that month — will saving again duplicate it?
No. Saving again for the same staff member and the same month updates that one existing entry — it never creates a second one.
I typed the wrong amount — what now?
Tap that staff member's row in the list to reopen the edit sheet, correct the amount, and tap "সংরক্ষণ করুন" (Save) again. If the teacher had already signed "বেতন বুঝে পেয়েছি" (Salary received), their signature does not change — but their own receipt will note it was "signed for the earlier amount", so nothing gets quietly hidden.
Ask AI about this page
Ask an AI app to explain this page in simple language.
Copied — now paste it
Get Hazira Khata free on Google Play
More tutorials
- How to set up your institution Once your institution profile exists you can add other teachers, and everyone sees the same classes and students.
- Inviting and approving teachers Adding a teacher to your institution — share the code, then approve the request with one tap.
- Assign a teacher to a class (make them a class teacher) Teacher joined the institution but sees nothing? This one job fixes it — 2 minutes.
- Who can see what — designations and permissions How your other teachers sign in, how much power to give each one through designations — and now, more precisely for one person, through permissions too.
- A teacher has left — removing a member Somebody has resigned, or you approved the wrong person. Take the name off in one tap without losing any of the attendance or fees they recorded — and how to leave an institution yourself.
- Taking admissions online Make one link and share it. Guardians fill the form from home, the applications land in your app, and approving one adds the student straight into a class.
- Join a school as a teacher Use the 6-character code your school gave you to join by yourself.
- Keeping the zakat and donation accounts A separate book for zakat, fitra, sadaqah and donations — who gave, which teacher collected it, and where it went.