
How to collect fees
Create the month's fee once, then record what each student pays. The app works out who still owes what.
The screenshots show the app in Bangla, its main language. The buttons sit in the same places in English.
-
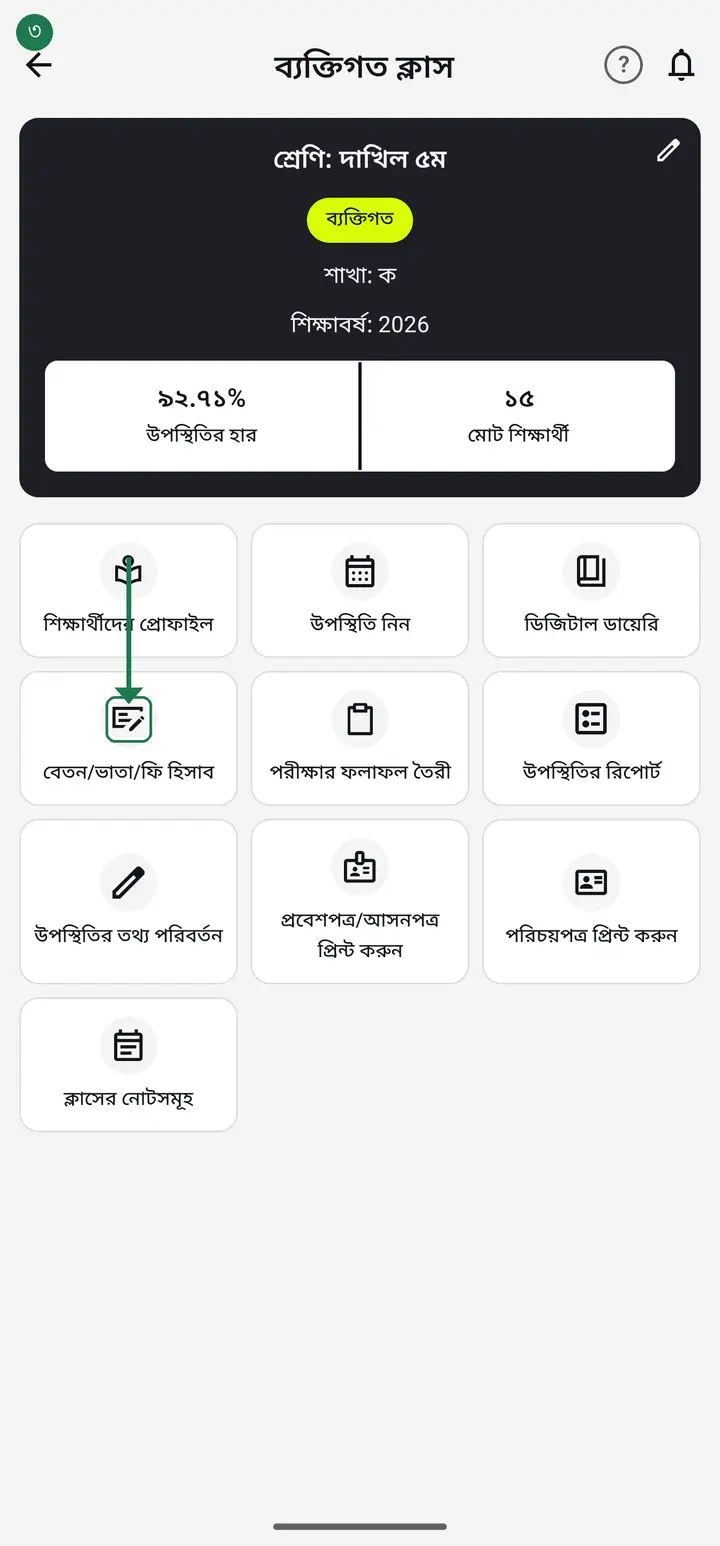
Tap "দেখুন" (View) on the class card, then tap "বেতন/ভাতা/ফি হিসাব" (Fees/allowance/payment).
-
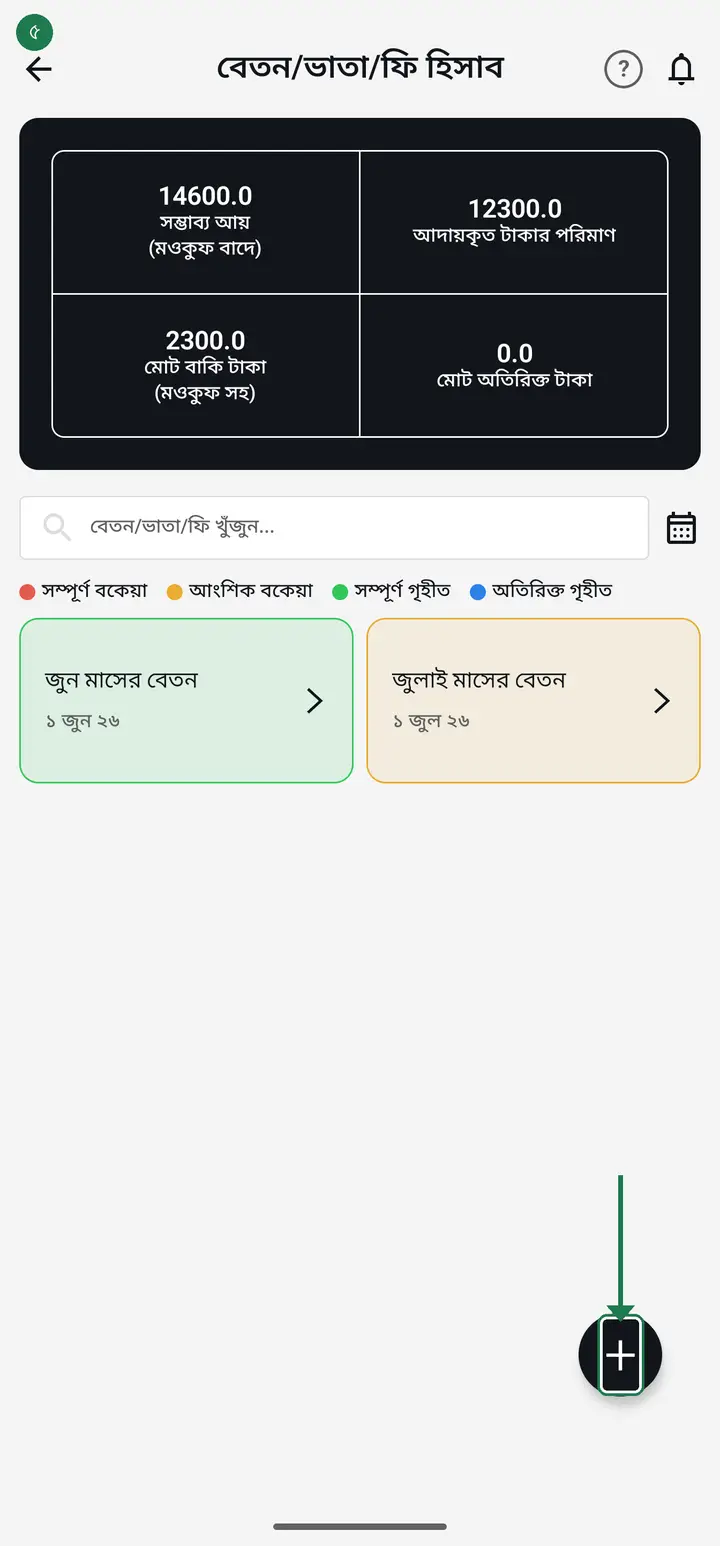
The boxes at the top of this page add up: মোট ধার্য = হাতে এসেছে + মওকুফ করা হয়েছে + এখনো বাকি. "মোট ধার্য" (total charged) is what was levied across everyone. "হাতে এসেছে" (received in hand) is only what was actually taken — not a single taka of waiver is inside it. "মওকুফ করা হয়েছে" (waived) is what was forgiven and will not be asked of anyone again. "এখনো বাকি" (still due) is what is genuinely outstanding after the waiver. On older versions (3.2.203 and before) these boxes were named "সম্ভাব্য আয় (মওকুফ বাদে)", "আদায়কৃত টাকার পরিমাণ", "মোট মওকুফ টাকা" and "মোট বাকি টাকা (মওকুফ সহ)" — the amounts are identical, only the names were made plainer.
One student paid the full 240; another paid 200 and had 40 waived — both show as "সম্পূর্ণ গৃহীত" (fully cleared), but "হাতে এসেছে" adds up to 240+200 = 440, not 480. That 40 never arrived, so it enters no collected-money total — it is shown separately in "মওকুফ করা হয়েছে".
-
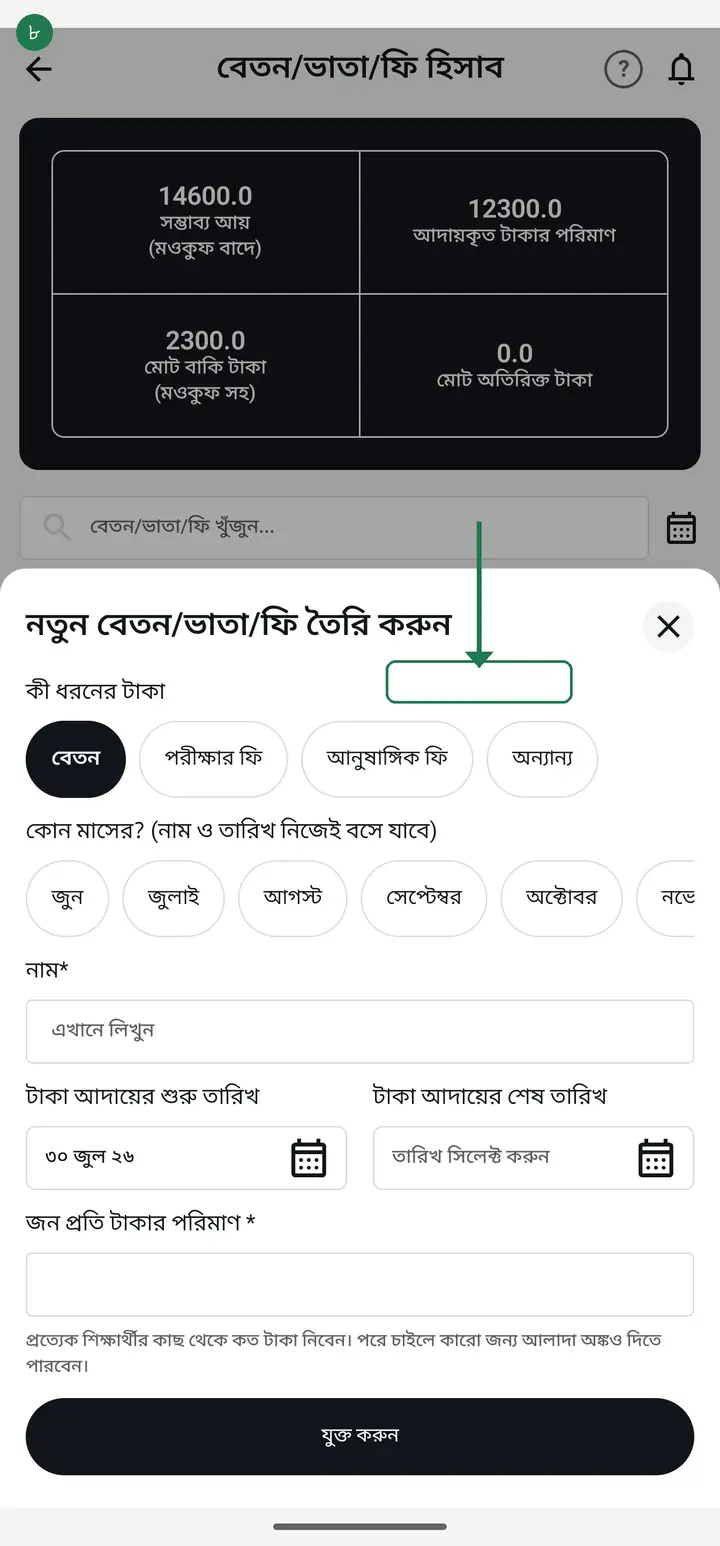
Tap the plus (+) button at the bottom. "নতুন বেতন/ভাতা/ফি তৈরি করুন" (Create a new fee) opens.
-
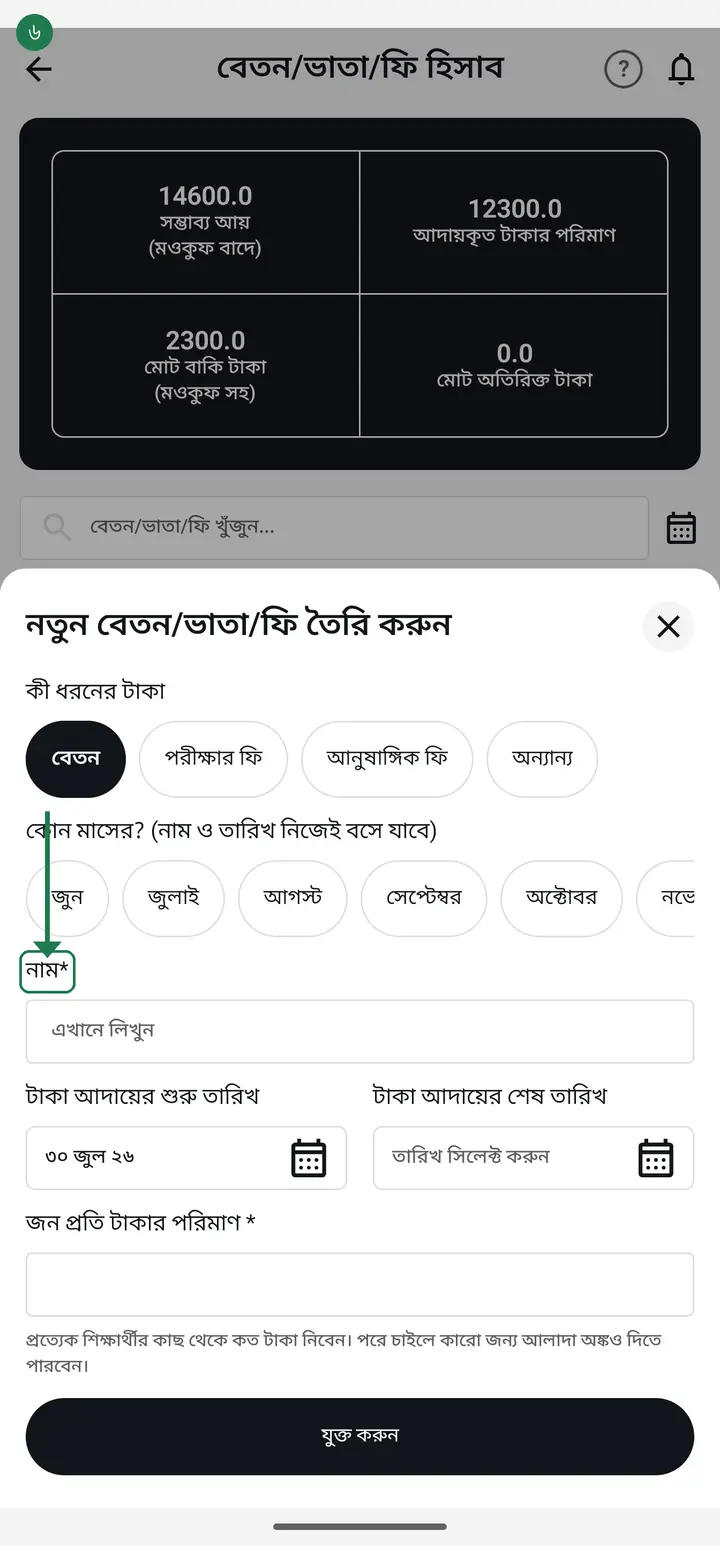
In "নাম*" (Name) write what the money is — for example মাসিক বেতন (monthly fee). Then pick which month it is for.
-
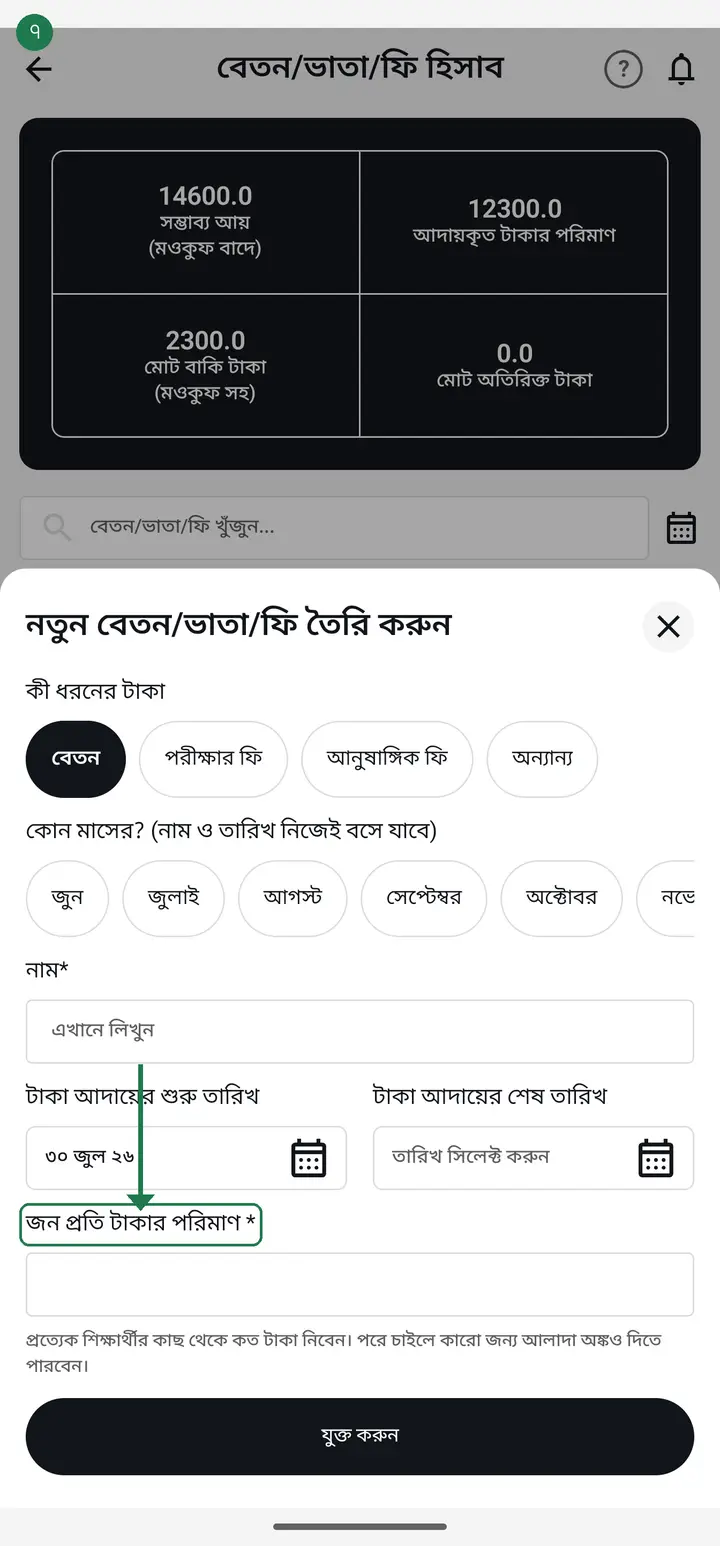
In "জন প্রতি টাকার পরিমাণ" (Amount per student) type how much each student pays — for example 500.
-
Tap "যুক্ত করুন" (Add). The fee is created, and it shows the total you can expect.
-
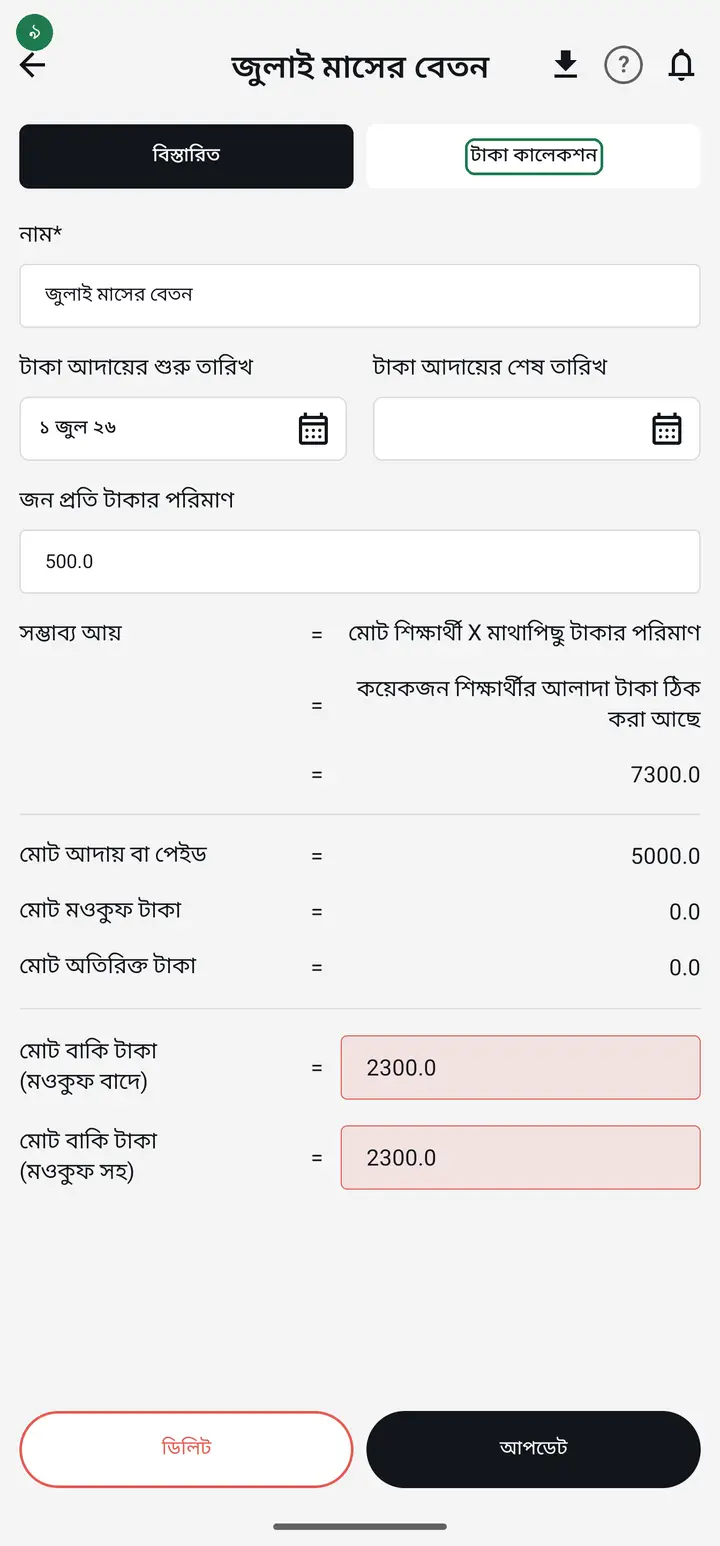
Tap the fee card you just made. It opens on "বিস্তারিত" (Details) — the totals. For the student list, tap "টাকা কালেকশন" (Collection) at the top.
-
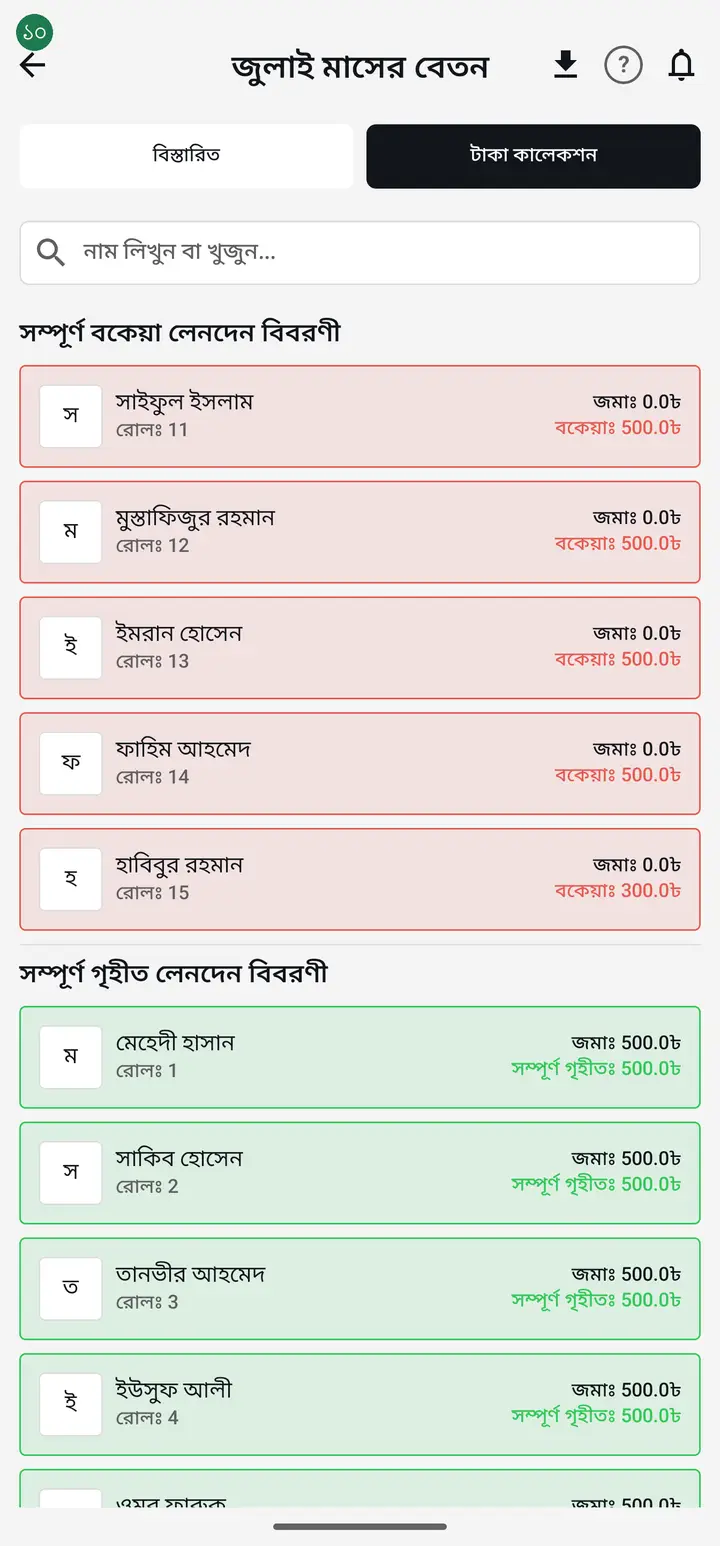
The list splits itself — unpaid ("সম্পূর্ণ বকেয়া") at the top, paid ("সম্পূর্ণ গৃহীত") below. Each name shows what that student still owes.
-
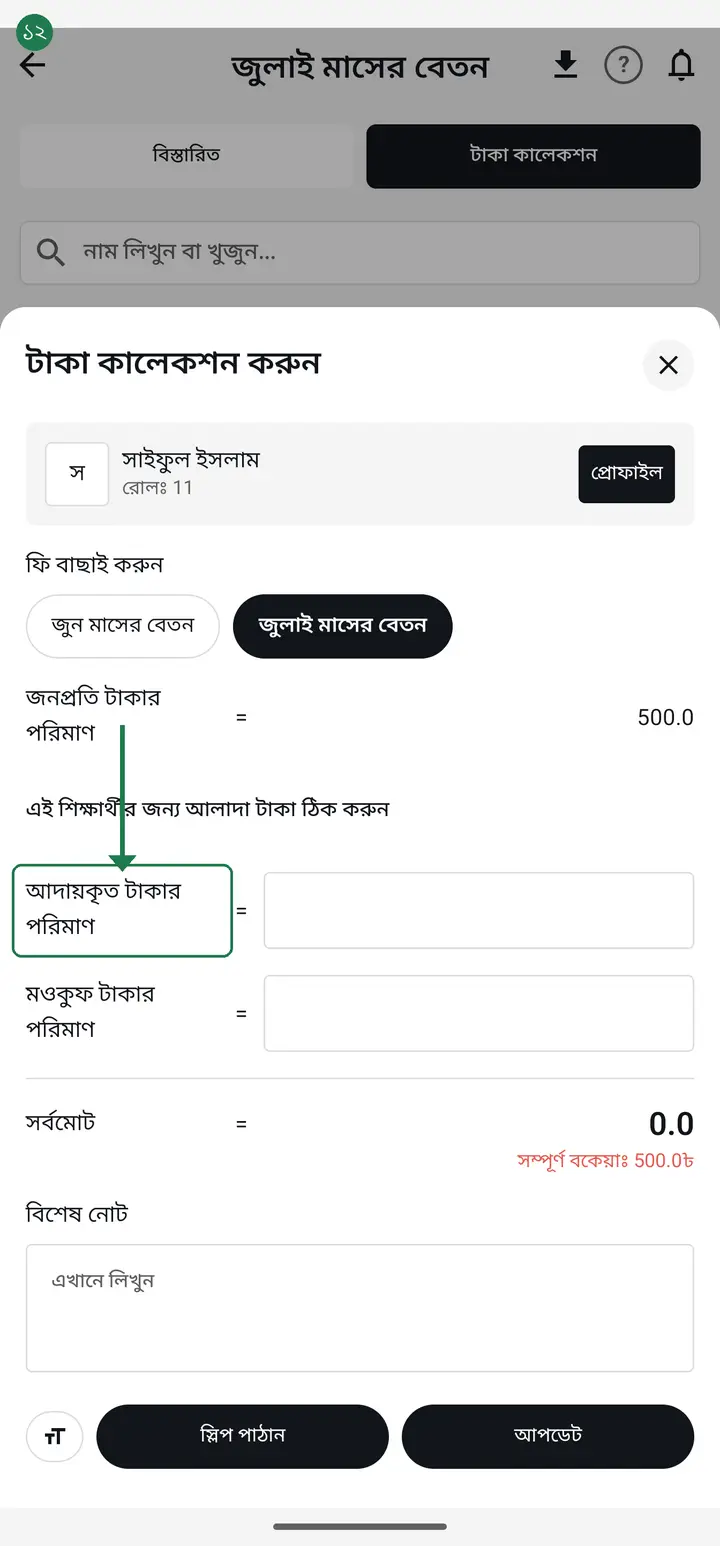
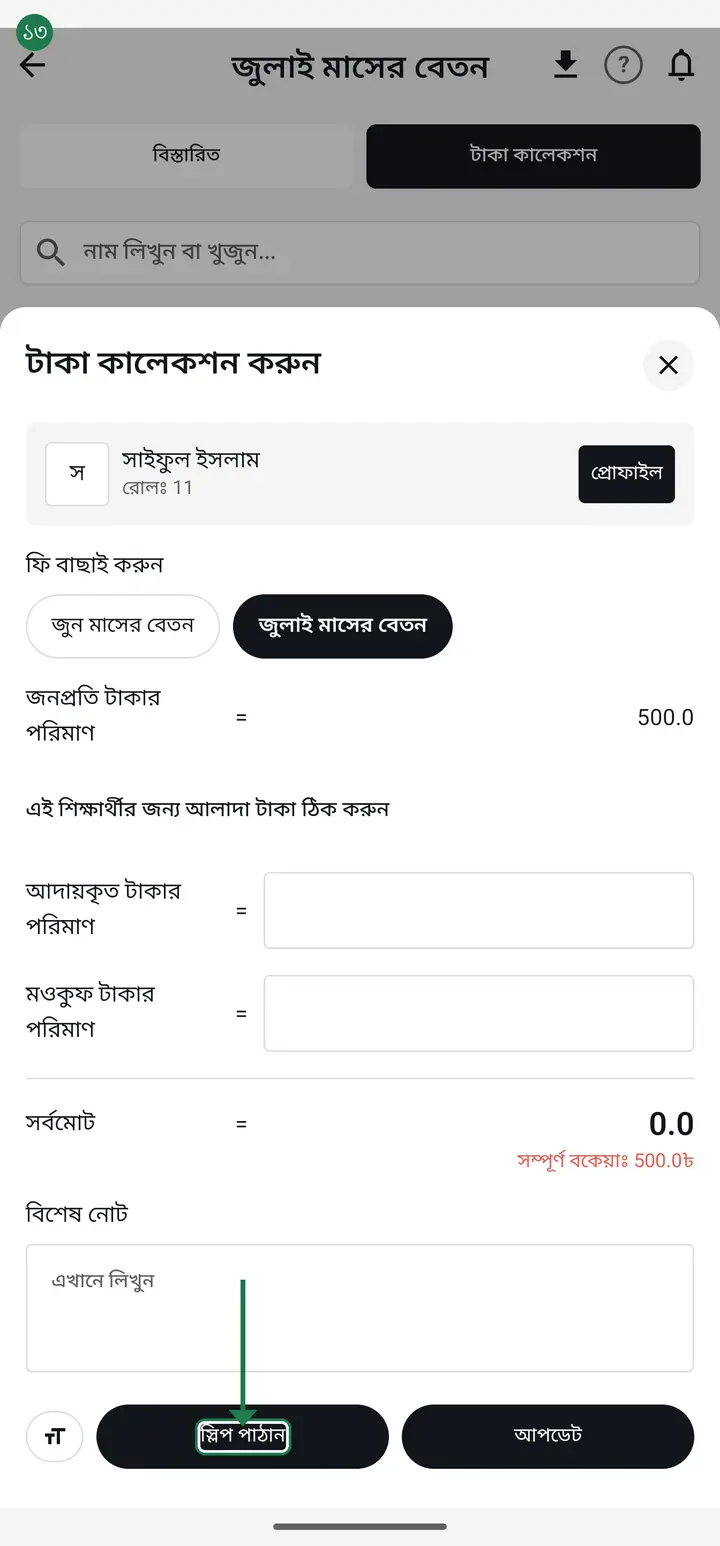
Tap the student who paid, type the amount into "আদায়কৃত টাকার পরিমাণ" (Amount collected), then tap "আপডেট" (Update).
-
If you like, tap "স্লিপ পাঠান" (Send slip) to send the guardian a receipt.
-
You can remind everyone who has not paid in one tap. On the "টাকা কালেকশন" (Collection) tab each group heading — "সম্পূর্ণ বকেয়া" (fully due), "আংশিক বকেয়া" (partly due) — carries an "এদের বার্তা পাঠান" (Message this group) button. It builds a message for everyone in that group, and **each family's message carries their own figure** — ৫০০ for one, ১২০ for another. No typing them out one by one.
This button has been there since 3.2.197 and has reached everyone. If you cannot see it, your app is an old build — update from the Play Store. How a guardian receives it then depends on them. Guardians connected to the Digital Diary all get it in ONE tap, each with their own figure, free. For guardians who are not connected, sending offers your own SIM instead — that now carries each family's own figure too, but because every message is different they go one at a time. Seven families owing means pressing send seven times; the screen shows "৭ জনের মধ্যে ২ নম্বর জন" (guardian 2 of 7) so you know where you are. Per-family amounts over SMS are in the newer versions — older ones sent one shared text with no figure at all. SMS is billed to your own SIM — hazirakhata.xyz/tutorials/sms-cost/
-
When the class does not all pay the same — an orphan or a hardship case paying less — you can set an amount per student. Tap the student's name to open the "টাকা কালেকশন করুন" (Collect money) sheet. At the very top it says "জনপ্রতি টাকার পরিমাণ" (Amount per head) with the class amount beside it. Directly below that it reads "এই শিক্ষার্থীর জন্য আলাদা টাকা ঠিক করুন" (Set a separate amount for this student) — a small pencil button on newer versions, plain text on older ones. Tap it, type that student's own amount, and tap "সেভ করুন" (Save).
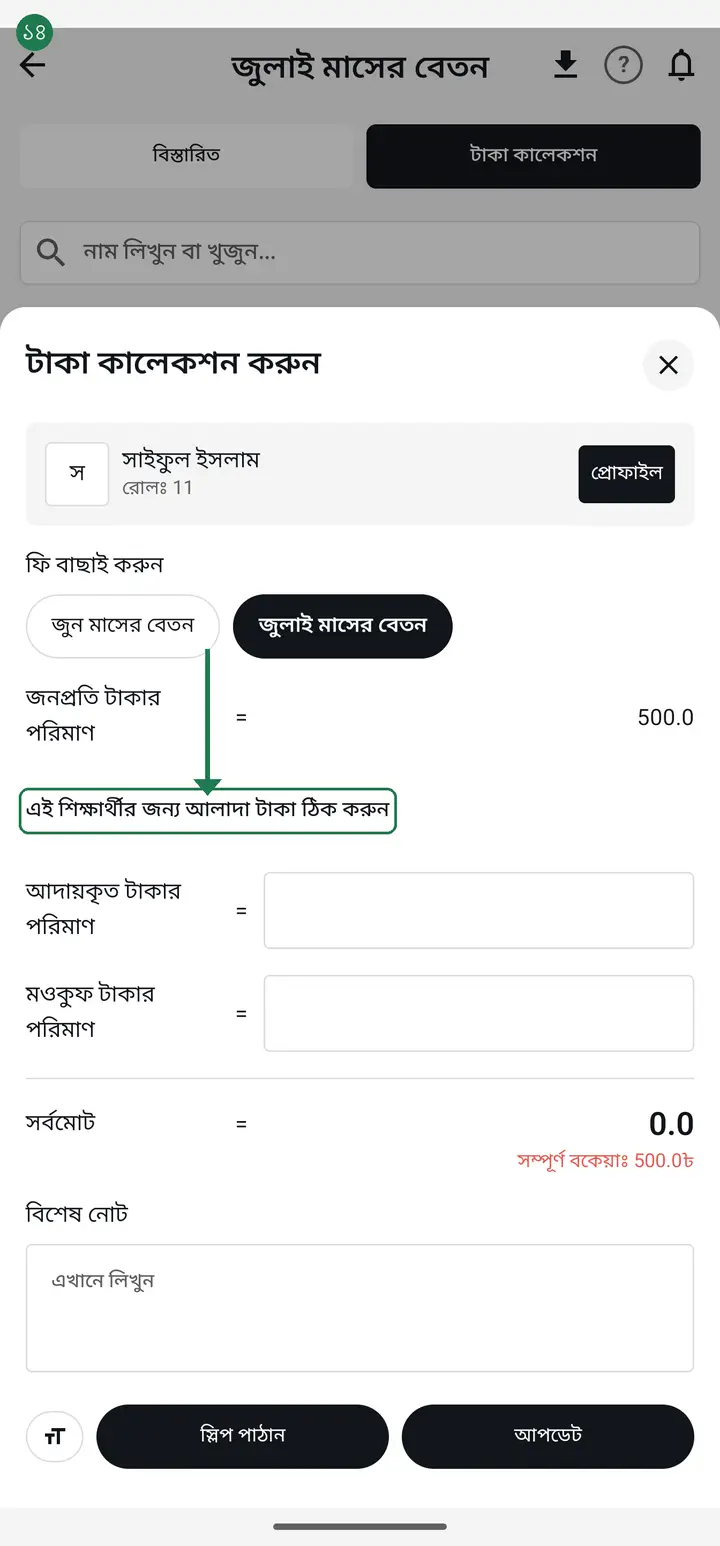
"মওকুফ" (waiver) and "আলাদা টাকা" (separate amount) are not the same thing, and this is where most mistakes happen. A waiver is a one-off reduction for this month and must be entered again next month. A separate amount is that student's permanent fee — set it once and their dues are calculated lower from then on. For a student who simply pays less, use the separate amount. And do not enter both: that reduces the total twice.
-
If students carry dues from before you started using the app, do not add that on top of the monthly fee — make a separate fee for it. Tap +, put "পূর্বের বকেয়া" (previous dues) in "নাম*" (Name), and in "জন প্রতি টাকার পরিমাণ" (Amount per student) put whatever amount most of them owe. Then go to the "টাকা কালেকশন" (Collection) tab, tap each student whose figure differs, choose "এই শিক্ষার্থীর জন্য আলাদা টাকা ঠিক করুন" (Set a separate amount for this student), type their own figure and tap "সেভ করুন" (Save). For students who owe nothing, put 0 and save — then nothing is asked of them. The month's fee stays exactly as it was, and the old dues sit in their own separate account.
You cannot put 0 in "জন প্রতি টাকার পরিমাণ" on this fee — it refuses with "প্রত্যেক শিক্ষার্থী কত টাকা দিবে সেটা লিখুন।" (Enter how much each student pays). So put the figure that most of them owe and correct the rest student by student. Also, students you set to 0 stay in the red group at the top of the list showing "বকেয়াঃ ০" — nothing is wrong, they owe nothing and add nothing to the outstanding total. The red only means "nothing has been collected yet".
Common questions
Where do I enter the dues students carried from before I started using Hazira Khata?
The app now has a dedicated place for this. Open the fee and tap **"শিক্ষার্থীদের আগের বকেয়া যোগ করুন"** (add students' previous dues) — you get every name on one page, type an amount only against the students who owe something, and one save covers them all. Fill in "এই বকেয়া কোন সময়ের?" (what period is this due from) at the top, e.g. "জুলাই পর্যন্ত বকেয়া" — that label is shown next to the amount later, so six months on you can still tell where the figure came from. Leave the box empty for anyone who owes nothing; type 0 to record that you checked and there is nothing left. **Do not raise the monthly fee amount instead** — you would lose the record of what that month's fee actually was, and receipts would print the wrong figure. Once dues are entered, the collection sheet shows three lines **only for a student who actually carries a previous due**: "জনপ্রতি টাকার পরিমাণ" (or "এই শিক্ষার্থীর নির্ধারিত টাকা" when that student has their own amount), "পূর্বের বকেয়া", and "মোট দিতে হবে". For a student with no old dues the middle two lines do not appear at all — not even as zero — and that is correct. So do not read “no three lines” as “the dues were not saved”; check on a student who does owe something.
If I add the arrears on top of August''s fee, will that extra amount carry into September by itself?
The fee AMOUNT is not copied forward — you create September's fee yourself, and if you type 5000 it stays 5000. **Even so, do not fold arrears into August's amount** — you would lose the record of what that month's fee actually was, and receipts would print the wrong figure; use "শিক্ষার্থীদের আগের বকেয়া যোগ করুন" instead. **But note what IS automatic now: the unpaid balance does carry forward.** When you create the next fee, a checkbox reading "আগের হিসাবের বাকি টাকা এখানে নিয়ে আসুন" is ticked by default and tells you how many students and how much taka it is about to bring — untick it if you do not want it. **One thing you still have to correct by hand:** that carried figure is a snapshot taken the day you created the fee. If a family settles the older month AFTERWARDS, the new month's "পূর্বের বকেয়া" does not drop by itself — open "শিক্ষার্থীদের আগের বকেয়া যোগ করুন", type 0 against that student and save.
Every class pays a different exam fee — 400, 300, 150. How do I set that up?
That is the normal arrangement and the app is built for it. A fee is never created once for the whole institution — **each class's fee is created inside that class**. So open the first class, create "পরীক্ষার ফি" and enter 400; come out, open the next class, create "পরীক্ষার ফি" again and enter 300; and so on, one round per class. Using the same name everywhere is fine — each one keeps its own class's accounts. Eight classes means eight rounds; there is no shorter path today. A student inside one class paying less is a separate thing — see "আলাদা টাকা" in the steps above.
Can the app print a notice listing the fee for each class?
Two separate things here, and they are easy to confuse. One: printing a notice — that is coming to the app. Inside a class there is a "বিজ্ঞপ্তি" option that prints a holiday, exam, admission or meeting notice on one sheet with the school name and logo on it. Two: what you are actually asking for — a button that builds the "which class pays what" list for you and drops it into the notice. There is none, and there is no point pretending otherwise. You type the class names and the amounts into the notice body yourself. Keep the money side in the app though: who paid, who owes, how much each class brought in is all worked out for you, and receipts go to guardians. If you want the fee list filled in automatically, tell the help desk.
How do admission fee, exam fee and monthly fee all appear on one receipt?
You do not add them together, and there is no screen to do that. Each fee is created separately with the + button — once for "ভর্তি ফি", again for "পরীক্ষার ফি", again for "মাসিক বেতন", one round per head. Then record what you took against each of them for that student. When you make the receipt, the app puts all of that student's fees on one slip by itself, one line each with the total below. You do not join anything up.
Why is one fee missing a line on the receipt?
A fee with nothing collected against it yet gets no line — a receipt is the paper for money actually taken. Record a payment against it and the line appears. It is still counted in the outstanding total either way.
I cannot see the "separate amount" option.
First make sure you are on the right screen — many people look on the wrong one. It is not on the fee-creation page. Go: open the fee → "টাকা কালেকশন" (Collections) tab at the top → tap the student's name → the "টাকা কালেকশন করুন" sheet opens → just under "জনপ্রতি টাকার পরিমাণ" (Amount per head) at the very top it reads "এই শিক্ষার্থীর জন্য আলাদা টাকা ঠিক করুন" — a small pencil button on newer versions, just small text on older ones. That is the one. If you are in the right place and it is still not there, it is a permission: in an institutional class only an institution admin can reprice a student, so for everyone else the button is not shown at all. In your own personal classes you always can. Ask your admin.
This student always pays less — do I write a waiver every month, or can I set it once?
Set it once; you do not need to do it every month. They are two different things — "মওকুফ" (waiver) is a one-off reduction for this month, while "আলাদা টাকা" (separate amount) is that student's permanent fee. For a student whose fee is simply lower (an orphan, a hardship case, a teacher's child), set "আলাদা টাকা" — from then on their dues are calculated lower by themselves and you never touch it again. Use "মওকুফ" only when you are letting someone off for one particular month.
A waiver means forgiven money — but the boxes at the top of "বেতন/ভাতা/ফি হিসাব" seem to add everything together, waived money included. Is that a mistake?
Not a mistake — and the confusion was our fault, which is why the boxes were renamed. Two of them used to carry a bracket line, "(মওকুফ বাদে)" and "(মওকুফ সহ)". Reading "(মওকুফ সহ)" it was natural to conclude that waived money was being counted as still owed — the truth was the exact opposite: the waiver had already been deducted. Those bracket lines are gone. The names are now "মোট ধার্য", "হাতে এসেছে", "মওকুফ করা হয়েছে" and "এখনো বাকি", and they add up: charged 1500, received 1000, waived 100, still due 400 — 1000+100+400 = 1500. On older versions (3.2.203 and before) these boxes were named "সম্ভাব্য আয় (মওকুফ বাদে)", "আদায়কৃত টাকার পরিমাণ", "মোট মওকুফ টাকা" and "মোট বাকি টাকা (মওকুফ সহ)" — the amounts are identical, only the names were made plainer.
I opened two classes — one shows fewer boxes at the top than the other. Why is the same app different?
Both are correct, neither is broken. The "মওকুফ করা হয়েছে" (waived) box appears only on a fee where somebody has a waiver recorded, and "অতিরিক্ত" (extra) only when somebody paid beyond what was charged. A class with neither shows fewer boxes simply because there is nothing to show. On older versions there were two boxes here, "মোট মওকুফ টাকা" and "আদায় + মওকুফ"; the "আদায় + মওকুফ" one has been removed — it was two figures welded together and people kept misreading it.
Do I need internet to record a payment?
No. You can record payments offline; they save on the phone and sync by themselves later. Do not wait for a confirmation tick.
Can I record money without creating a fee first?
No. You must create the month's fee first; only then does the place to record each student's payment appear.
What if I have not added students yet?
Add the students' names and rolls first, otherwise the collection list will be empty.
The class is mine, but I cannot see the "বেতন/ভাতা/ফি হিসাব" button at all. Is the app broken?
No, nothing is broken and nothing is lost. Your institution's admin can decide per class who collects fees. If you are not on that class's list, the button does not appear for you — attendance, students and reports all stay exactly as before. Going in through a student profile or the "প্রতিষ্ঠানের শিক্ষার্থী" list will say "এই ক্লাসের বেতন কালেকশনের অনুমতি আপনার নাই" (you do not have fee collection permission for this class). Ask your admin to open the class's "এডিট" → "বেতন কালেকশনের অনুমতি" box, tick your name and tap "ঠিক আছে". Fully close and reopen the app and the button is back.
My সহকারী শিক্ষক can see every student''s dues and the whole "বেতন/ভাতা/ফি হিসাব". The tutorial said an ordinary teacher cannot see the accounts?
That line is about **staff salary** and the **institution's income/expense** — both still fully closed to an ordinary teacher. The confusion is that "বেতন" appears twice in the app: inside a class, **"বেতন/ভাতা/ফি হিসাব"** is the STUDENTS'' fees, while **"বেতন ব্যবস্থাপনা"** in the আয়-ব্যয় tab is STAFF salary. A class teacher sees and collects his own class''s student fees — close that and he could not collect at all. But **changing a fee''s amount or name, creating a fee, deleting a fee** are not his to do: those are admin/head-master only, and since the August 2026 update tapping them says "শুধু এডমিনের জন্য". If you also do not want him collecting that class''s money, turn it off in the class''s "এডিট" → "বেতন কালেকশনের অনুমতি". The full per-designation table is on the "কর্মকর্তার পদবী ও অনুমতি" page.
Ask AI about this page
Ask an AI app to explain this page in simple language.
Copied — now paste it
Get Hazira Khata free on Google Play
More tutorials
- When students pay different amounts One student pays 1000, another 2000, another nothing — each can have their own amount. Old dues are recorded the same way.
- Previous dues — recording old arrears and carrying them forward Enter the dues students carried in from before you started using the app, and let each month's unpaid balance carry into the next month by itself.
- How to make a marksheet Create a subject's mark form, enter the marks, then print the whole class's marksheet.
- Getting every student's result in one go The whole class's results in one PDF in one tap — one page per student, so you never export them one at a time. Print it, or keep it in your own Google Drive and find any student by name years later.
- How to make admit cards and seat cards Make and print exam admit cards and seat cards yourself — with the logo, signatures and dates. Both live on one screen, as two tabs at the top.
- How to make student ID cards Make and print student ID cards yourself — with your logo and their photos.
- How to make staff ID cards Print ID cards for teachers, office staff, guards and support staff — all on one sheet.
- Importing attendance from a machine Take the file off your fingerprint machine and load it into the app — the attendance fills itself in.