
How to make staff ID cards
Print ID cards for teachers, office staff, guards and support staff — all on one sheet.
The screenshots show the app in Bangla, its main language. The buttons sit in the same places in English.
-
On the home screen, tap the "প্রতিষ্ঠান" (Institution) tab.
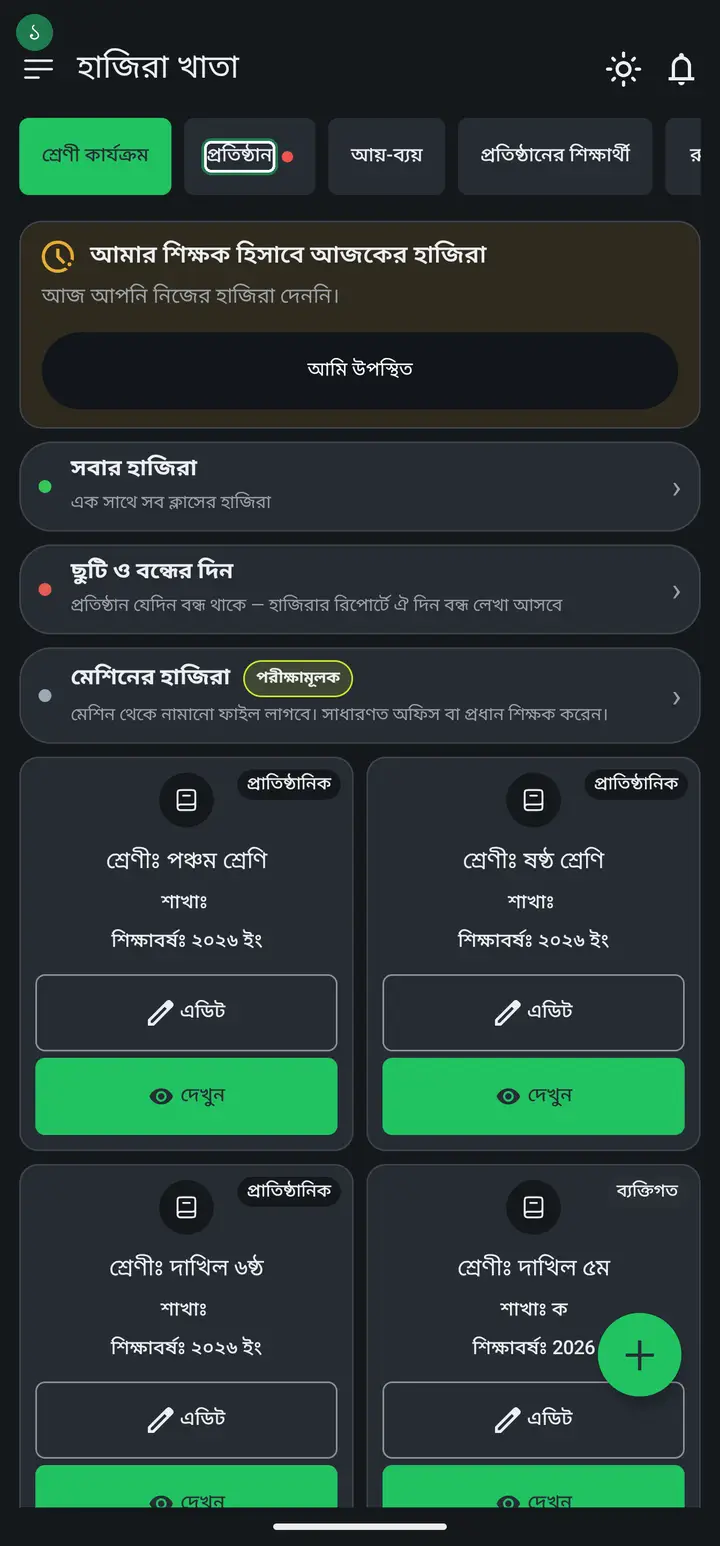
-
Tap "সম্পূর্ণ প্রতিষ্ঠান ড্যাশবোর্ড" (Full institution dashboard).
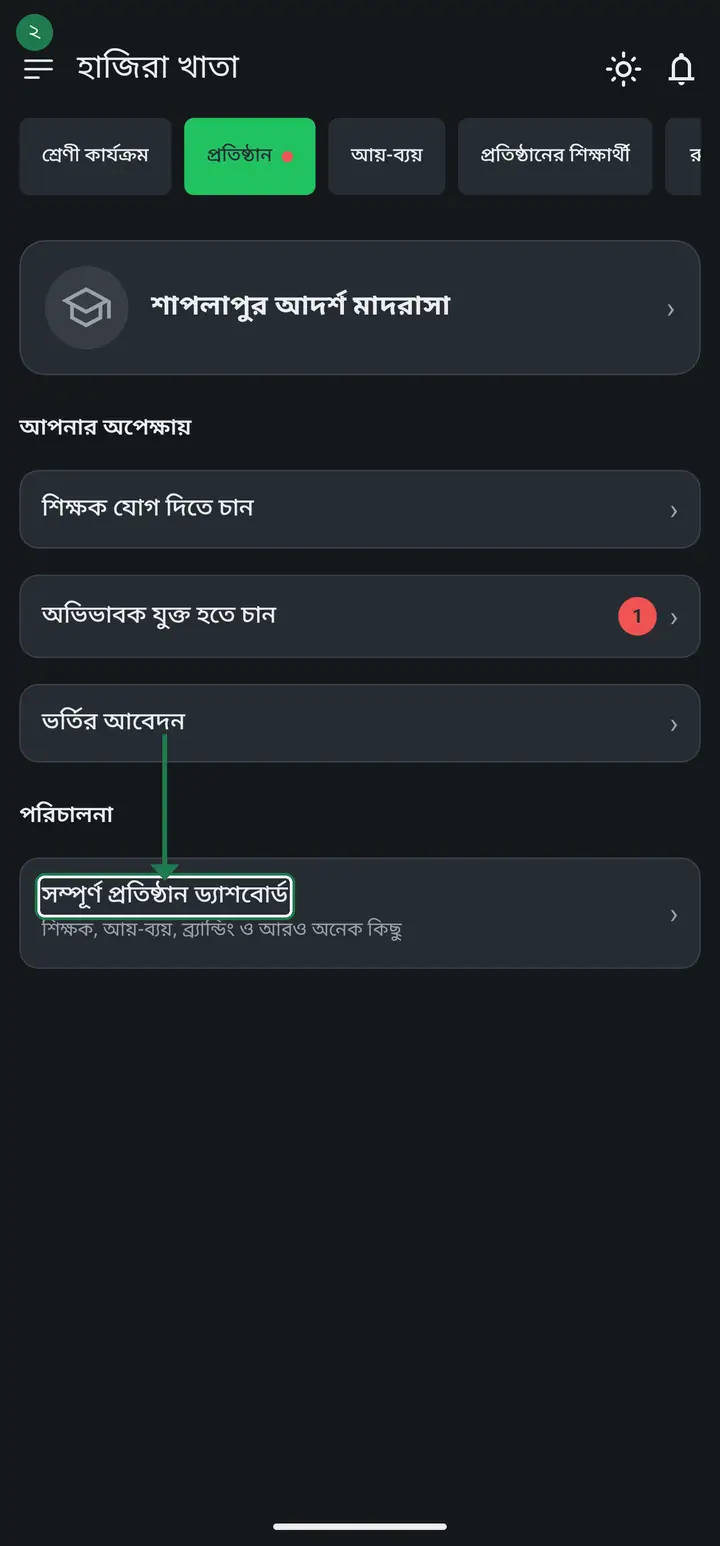
-
Scroll down a little to "কর্মকর্তা-কর্মচারী পরিচয়পত্র" (Staff ID card) and tap it.
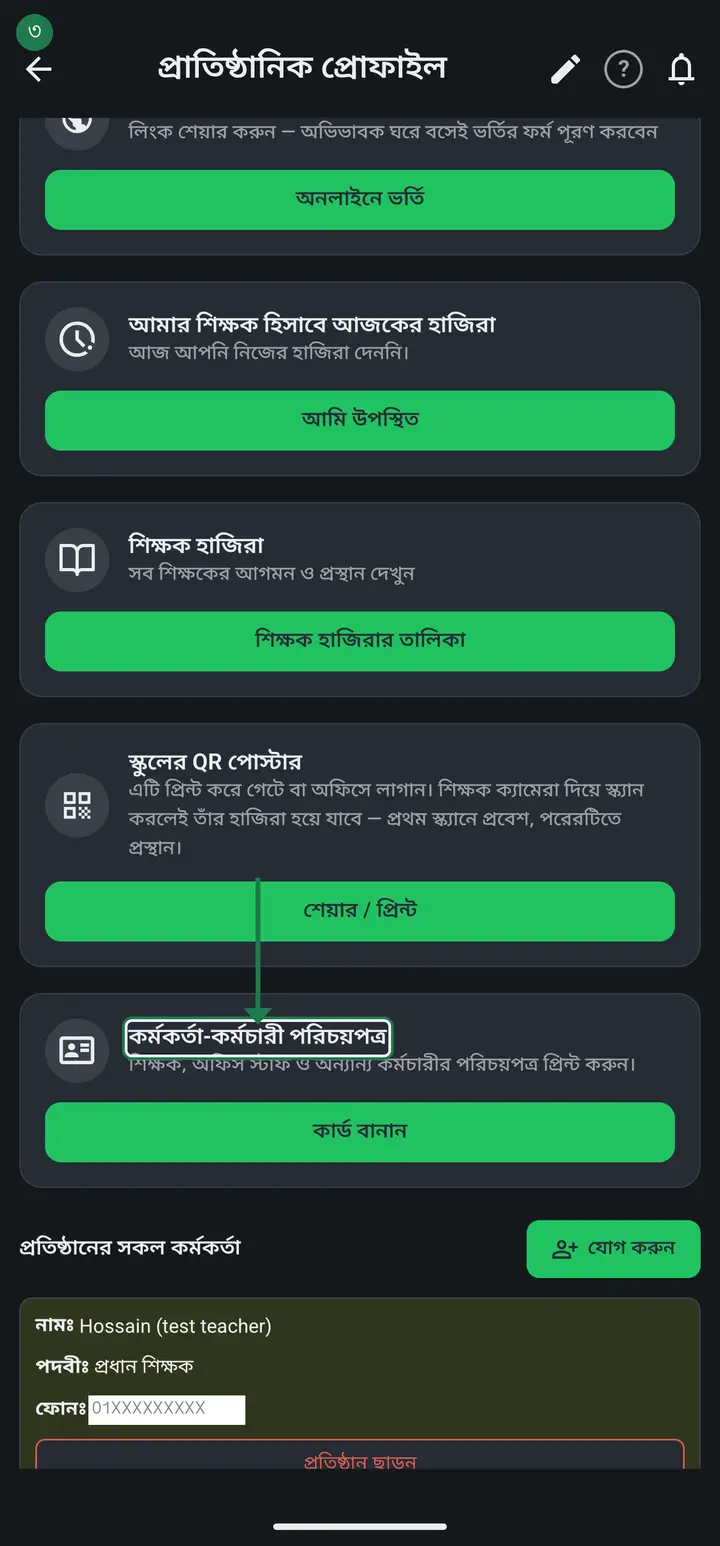
Only the head master and admins can see this. It will not appear for an ordinary teacher — that is deliberate, not a bug.
-
Everyone is ticked by default. Untick anyone who does not need a card, then tap "পরবর্তী" (Next).
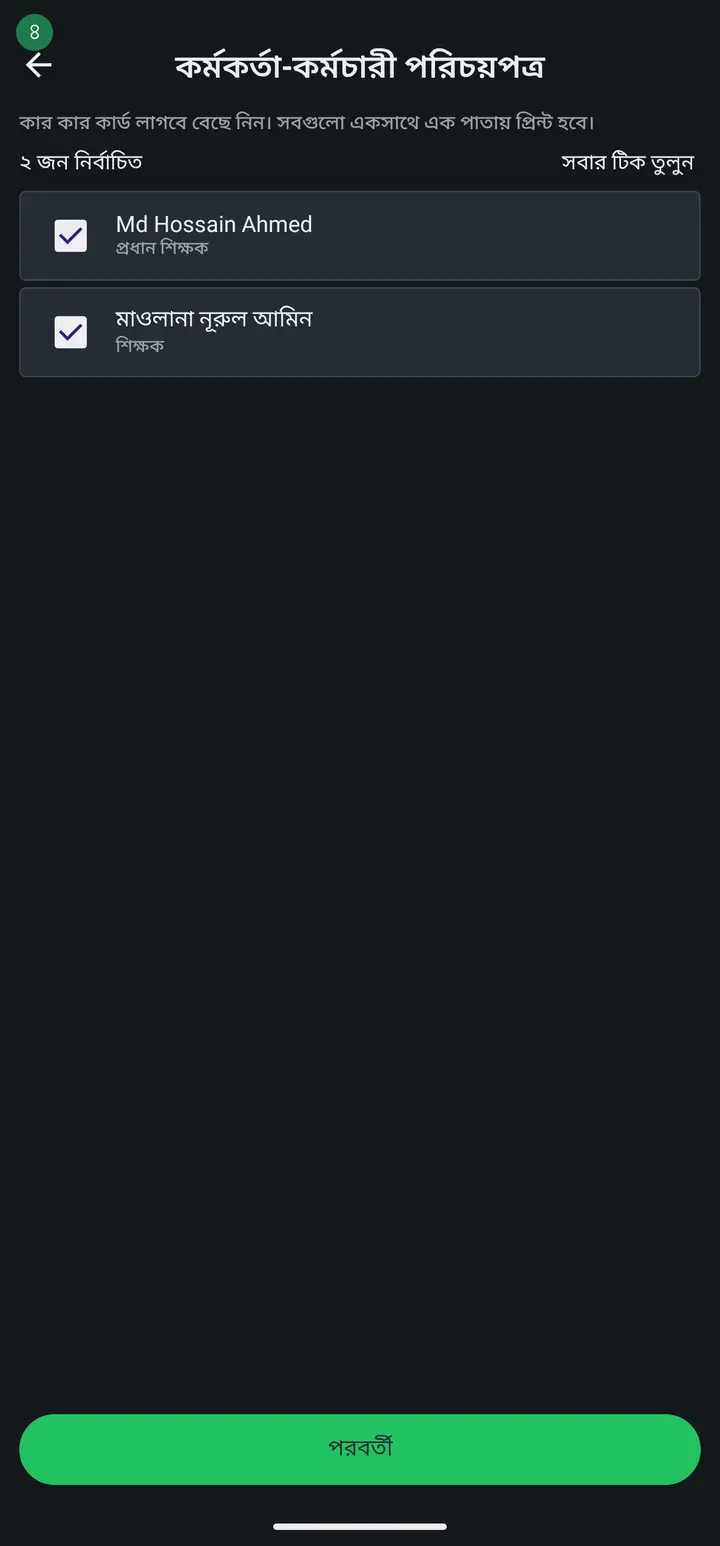
-
The form is the same one as the student ID card. Fill in the school name, address, logo and validity. Turn on the switches for whatever you want on the card — photo, mobile number, date of birth, address, emergency contact.
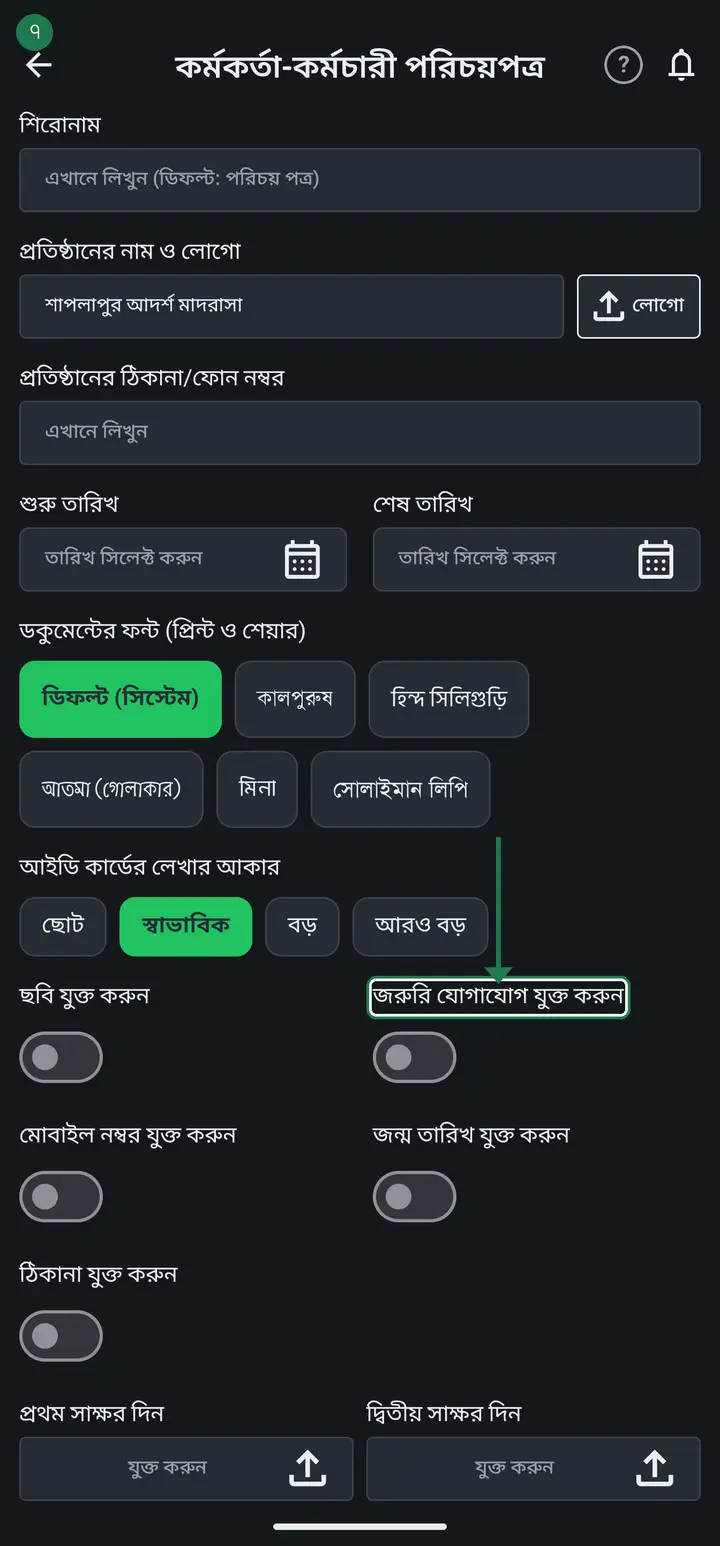
-
Tap "দেখুন" (View) to preview. Pick one of the six designs at the top and the font and text size below, then tap "প্রিন্ট করুন" (Print). All the cards come out on one sheet.
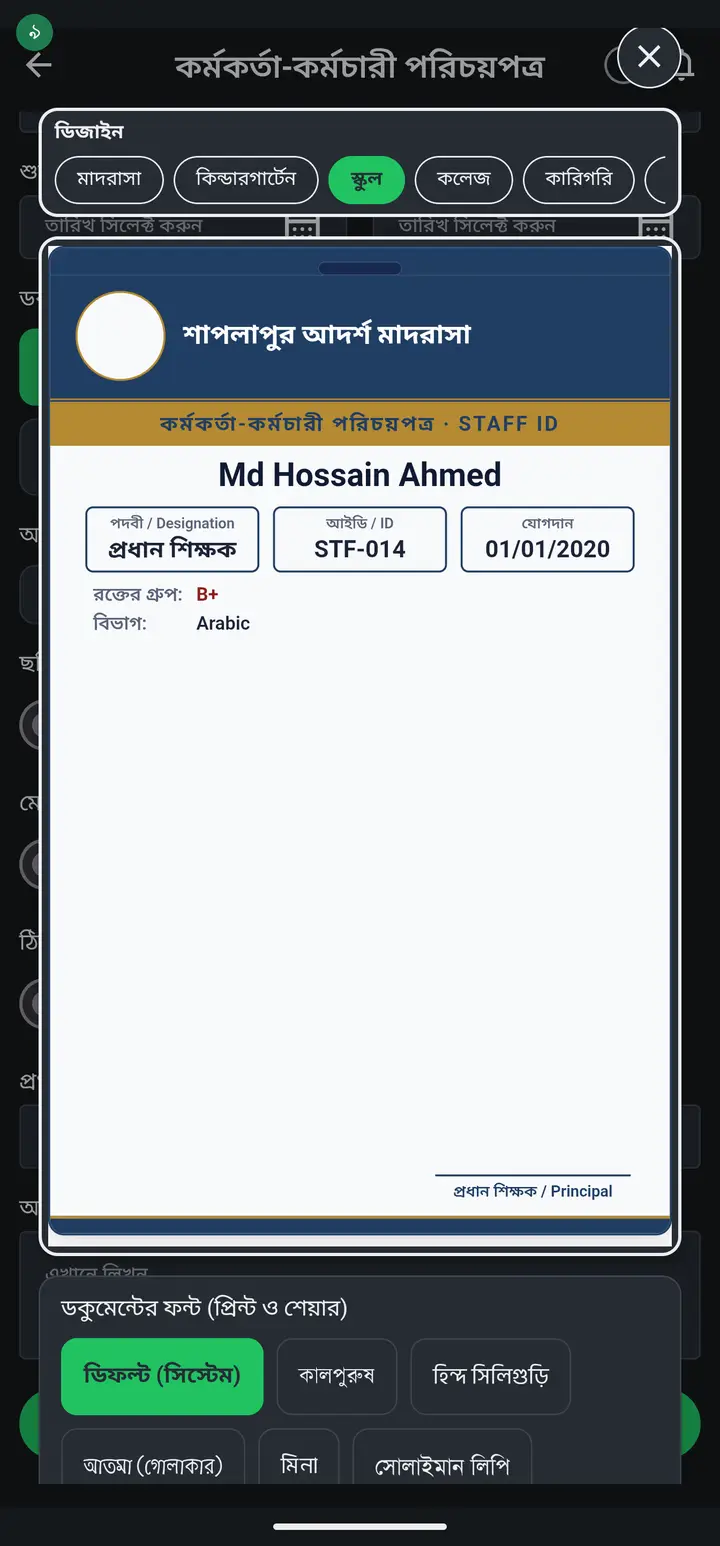
-
The post and mobile number come across on their own — whatever designation that person has in the member list is what the card prints. But the ID, department, blood group, joining date, date of birth and emergency contact all come from their staff file.
If nothing but the name and post comes out, that is not a card problem — that person's staff file is still empty. Open them from the member list, fill the boxes in, then make the card again. Whatever you leave blank is dropped from the card entirely — you never get a bare label with nothing beside it.
Common questions
Can a staff card's back be coloured like the front, and carry the institution's contact details?
Both, from 3.2.219. The back takes the front design's colour — top bar and border — and with "কার্ডের পিছনের পাতা" on, a second box called "নিচে প্রতিষ্ঠানের যোগাযোগ" appears under the wording. Type a mobile number, e-mail or address there and it prints on every back. Leave it empty and nothing is printed.
I want the back of a staff card printed too.
From 3.2.217, the same as student cards. Tap "দেখুন" (View) and turn on the "কার্ডের পিছনের পাতা" switch under the preview. It starts with the "please return this card" wording, which you can change. Use {নাম} {পদবী} {আইডি} {বিভাগ} {মোবাইল} inside the text and each card gets that person's own details. It uses twice the paper.
After printing, the card does not fit a holder, or the two sides do not line up.
Same as student cards — they are built at true CR80 size (53.98 x 85.6 mm), so print at "100%" / "Actual size" with "Fit to page" off, and for two-sided printing choose "Flip on long edge", not "Short edge". Neither setting is in the app; both belong to the printer.
The staff cards'' fronts and backs do not line up — the backs are shifted by one.
Student cards do the same thing, because both print through the same routine. Three cards fit across a sheet; when the last row holds fewer than three, the current release prints that row's backs shifted by one column, so a back lands on the wrong person. Full rows are unaffected. It is fixed and arrives in an update — until then, turn the last sheet over and check it against the fronts before you cut.
Why is the same teacher's name showing twice in the list?
Because that one person is stored twice — once as a real member who signed in and joined the institution, and once as a name you typed in by hand under "ফোন নেই এমন শিক্ষক বা কর্মী" (staff without a phone). The app treats those as two separate entries, so both appear. It usually happens when someone had no phone at first, was written in by hand, and later started using the app themselves. To fix it: open the staff-without-a-phone list on the staff attendance page, tap the hand-typed name, then tap "এখন ফোন ব্যবহার করছেন" (they use a phone now) and pick their own account. The two become one, and the attendance and details already recorded against the hand-typed name move across with them — nothing is lost. If the hand-typed entry is not needed at all, switching it off from the same place removes it from the list.
The staff address is filled in the profile, but it does not appear on the card.
The address is not printed automatically. The form has a switch labelled "ঠিকানা যুক্ত করুন" (Add address) — turn it on and every card prints that person's own address. The sample card at the top shows the FIRST person in the list, so if their profile has no address the sample will not change, while everyone else still prints correctly.
Ask AI about this page
Ask an AI app to explain this page in simple language.
Copied — now paste it
Get Hazira Khata free on Google Play
More tutorials
- How to collect fees Create the month's fee once, then record what each student pays. The app works out who still owes what.
- When students pay different amounts One student pays 1000, another 2000, another nothing — each can have their own amount. Old dues are recorded the same way.
- Previous dues — recording old arrears and carrying them forward Enter the dues students carried in from before you started using the app, and let each month's unpaid balance carry into the next month by itself.
- How to make a marksheet Create a subject's mark form, enter the marks, then print the whole class's marksheet.
- Getting every student's result in one go The whole class's results in one PDF in one tap — one page per student, so you never export them one at a time. Print it, or keep it in your own Google Drive and find any student by name years later.
- How to make admit cards and seat cards Make and print exam admit cards and seat cards yourself — with the logo, signatures and dates. Both live on one screen, as two tabs at the top.
- How to make student ID cards Make and print student ID cards yourself — with your logo and their photos.
- Importing attendance from a machine Take the file off your fingerprint machine and load it into the app — the attendance fills itself in.